Tips & Tricks
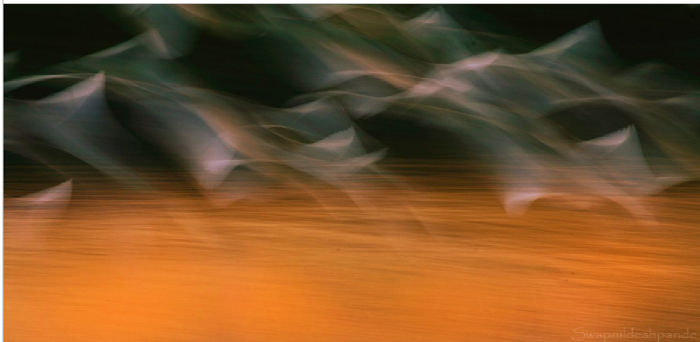
"The Race" begins
1x Blog-Tips & Tricksby Editor Swapnil Deshpande
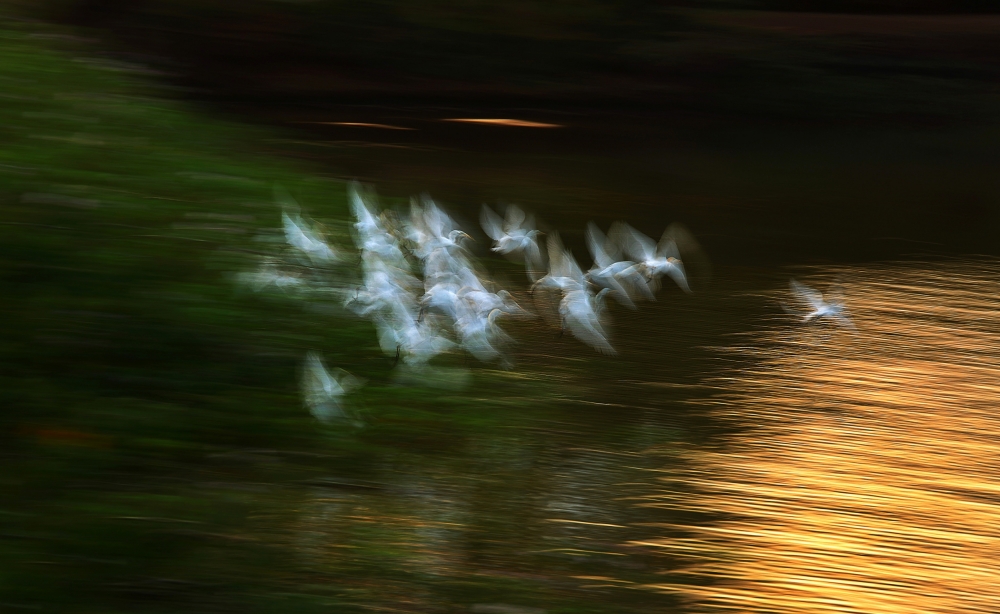
Canon 5dmarkiii . 70-200f4LIS . f/13 . 1/4sec . ISO100 . handheld
After a beautiful sunny day, the sun was setting beyond the lake.
Everyday a flock of birds was flying towards their homes after fishing around the whole day. There always is a myriad of birds flying across the banks and around trees. I have always loved observing their activities both on the dusk and the dawn when they are most active.
It is during these observations that I thought about creating a picture which will have the dynamism of the movement as well as a little story that an average human mind would conceive. So after the thought process was set I started to execute my plans.
Basically the primary elements of exposure needed for this kind of pictures is the shutter speed that is dependent on the speed of the flock's flight.
A lot of “trial and error” is needed to keep details on the birds along with the blur of the wings.
We basically need something between 1/30th to ½ of a second of course depending on their speed. Anything faster will freeze the motion and slower will create unrecognizable blur.
You will notice in the shot above that it is taken at 1/4th of sec, thus below 1/6th of second . Even with such a tiny little difference we would loose almost all the details on the birds.

From my observation, I can say that you must try these kinds of shots immediately as the flock starts its flight. A little slower first and than it accelerates gradually. That's why setting the perfect shutter speed for the start will tend to give a higher success rate.
Another important point to remember is always shoot when the flock is dense.
I tried to shoot this frame with only a few birds but it doesn’t work.
A dense flock not only creates dynamism with many wings but is also much more aesthetic.
Focal length is equally important since it creates a scale. This is quite subjective as some will like tight compositions showing only the flock and some others may like to include the habitat which tends to add more to the story behind the picture.
I tried the same picture at 600mm with the following result and it adds to the abstract feeling of the image. But setting a focal length of 200-300mm will include the habitat and will lesser compress the birds.
The shooting “mode” is very important too.
Generally we all tend to shoot in continuous mode but in this case, I would recommand to click once when the flock starts to fly as next series of shots will normally not work since the speed of the flock increases. With the sale shutter speed, the details will get lost. The instantaneous moment will work much better.
POST PROCESSING
After many trials and failures, I finally got the picture as seen below (in raw format).
At first sight, it looks quite murky and washed out. Do note that I did not bias the exposure dial. Increasing exposure in camera simply would have washed out the details on the lake and decreasing the exposure would have darkened the whites of egrets making them grey.
Adjusting the exposure while editing the picture helps to correct it and give it the look we want.

I opened the picture in ACR 7 and made basic adjustments on the white balance (to increase the warmth) and on the exposure. I decreased the exposure to -0.7 and pumped the contrast to +34 to make the whites on the egrets popping out and also to make the background darker.
At the end, I did minor adjustments on the white and black points and decreased the highlights to get details in the lake. Below, a screenshot of the adjustments in camera raw.

After getting the optimum contrasts and the details I opened the pic in CS6 and used my NIK colour efex pro4 to fine tune the picture.
- I used the graduated neutral density plug in colour efex pro and clicked the darken sky preset. Every preset has to be fine-tuned in a way it suits the image.
- I lowered the upper tonality to -44% and lower tonality to -20% and increased the blending to +60% to get smooth transition in colours. This made the background darker and the lake more orange adding more punch.
- I clicked on “add filter” and selected the detail extractor preset. Then I clicked on “add control points” which allows me to make adjustments in the part of the picture I wanted. I selected the area around the birds and increased the detail extractor tab to 12% .This made popping up the details on the birds.
- I added again another filter selecting the “brilliance/warmth” preset.
Using once more the “add control points” I selected the lake and increased warmth to 20% and the saturation to +8% to give the lake a punchier look.
Back in CS6 I made a selection on the lake and on the birds and applied the “unsharp mask” set on 60% with radius on 1pixel. I left the foliage soft as it was.
I was pretty satisfied with the result and decided to upload it in the 1x critique forum. Here I got a very impressive suggestion by Doug Gimesy in which he suggested to crop the pic 16:9 to give a sense of motion.
SOME USEFUL TIPS ;-)
- Observing and anticipating the movements of the birds is essential to create any nature shot.
- As explained above, try different shutter speeds depending on the available light and the speed of flight of the flock.
- The post-processing of these pictures is extremely important as more than often the raw files will look murky. Don’t delete on field, analyse each image on the editing screen.
- Try various editing styles, depending on the mood that perfectly matches the pic.
- Give emphasis on the fundamentals of exposure, most important being shutter speed and ISO. Keep the ISO as low as possible to help getting the optimum shutter speed.
- And most important of all, enjoy experimenting.
. '