Articles
SLC-2L-13: Shoot Through Your Sunset
StrobistWhenever you have control over the time of day in which you'll be shooting a location portrait, always remember that the hour that wraps around sunset will offer you at least five different lighting environments in which to work.
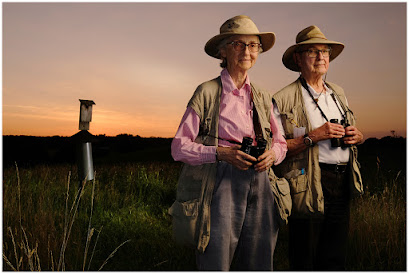
And for today's portrait of birders Jo (left) and Bob Solem, we're going to use three of them.
I photographed the Solems for the Howard County Conservancy as part of a campaign for their 30th anniversary. We did a total of eleven portraits of patrons of the conservancy, all shot outdoors. The project was a great way to spend an otherwise socially distanced summer during the COVID pandemic.
We shot mostly in July, which meant that many of the sessions were done in oppressively hot weather. So when it was practical to do so, shooting at sunset helped to take the edge off in addition to giving good light possibilities.
What Time Should We Be There?
If I am in control of the time, I usually aim for the subject to arrive 30 minutes before sunset. This will give us time to chat and get a little bit acquainted before the fist zone of light presents itself.
Ideally, I have arrived thirty minutes beforehand and have my lights assembled and loosely set up. Since I don't usually work with assistants, this leave me free to try to keep the subjects relaxed and maybe develop a little rapport before we start shooting.
For the Solems, the latter was totally unnecessary as they are both very chill and happy-go-lucky. They showed up looking totally the part, each sporting the exact model of Domke photo vest I well remember from my college days.
Instead, it was their back-and-forth banter that put me at ease, and instantly admiring the great marriage they have obviously built together as they approach their 60th anniversary.
My main thought was that given the heat, I did not want to stretch them too much. We'd keep the pace reasonable. Shoot time, relax and chat a little bit. Should work out fine.
Zone One: Golden Light
Our first lighting environment will be taking advantage of the golden light that arrives about 15 minutes before sunset. Sunset is at 8:32pm for this night (always check!) So I grab a few frames while we are chatting.
Important to remember: if nothing else works tonight, we are covered. We already have something good in the can (an expression from the old film days) and no one can take that away from you.
Having these frames gives me two things. One, I can relax because I know I am not gonna get blanked. And two, you can say something like, "Oh, this one looks nice," and turn the camera around to show them.
Remember, they have no idea how they are going to look. And this first version looks pretty cool — a little cinematic, almost like something from an old western. Which in turn de-stresses them a bit as well.
So very quickly (before we lose the light) we are going to turn things around and shoot into this golden light.
Zone Two: Into the Sun
Since my lights are pre-staged, it's quick and easy to position my key light (A Paul Buff Einstein 640 in a 47" Octa) to light against this sunset.
I'm also using a fill light here — a second e640 in a strip light. But it is dialed waaay down. I am not even sure it is contributing much. It's mostly preset there for the post sunset photo when we'll really need it.
When shooting into pre-sunset golden hour, you can often get away with just one light. Yes, it is still going to leave some black in the shadows. But if I angle everything right, the sun itself is going to create some Michael Bay-sian flare and wrap up in there. So it should all work out.
In fact, here the sun is doing some cool things for me. In addition to the nice flare, it is also backlighting the grasses nicely and defining the edges of their pants. That internal contrast also helps to make a fill light unnecessary. The sun is also nuking Jo's ID case in her camera left pocket, which I could do without. But I missed that while shooting.
In terms of exposure here I am going to be in full manual mode, and not using the <a href="https://strobist.blogspot.com/2018/06/slc-1l-04-hack-for-manual-flash-at.html">aperture priority sunset trick</a> to automatically keep track of my ambient exposure. This is because how I position the sun (mostly whether I hide it behind them or not) will greatly affect the camera's exposure choices on "A" mode.
So I just grab my ambient exposure, and adjust my key light to match the aperture. Well, make that almost match. Because if you look at the frame, you can see that my key light is maybe a stop underexposed.
Why is that? Because even though it is lit, I want the photo to look more like the way your eye would see it. Your eye would still discern detail in the Solems, even though you were looking right into the sun. The camera, without the added flash, would not be able to see this contrast range. With the exposure level for my flash, I am kinda splitting the difference to bridge the perceptual gap between your eye and your camera.
Also, I've stuck a 1/2 CTO warming gel on the flash to help to chromatically marry the key light to the late sun. I just want to get the two light sources in the same neighborhood so they track a little better. Then I'll adjust the overall color balance in post if needed.
Zone Three: Ambient-Lit Afterglow
Just after sunset, a third lighting zone presents itself. You can use the soft, directional afterglow as a beautiful key light by just rotating your shooting direction 90 degrees.
Note: if you are photographing a vehicle, this is almost certainly going to be your best ambient light. Just shoot with the sunset behind you, using the afterglow as your light source. With that soft, gradient light behind your shooting position, your car will reflect the light source and be an instant standout in the Craigslist ads.
And this light would look great on the Solems as well. But I am going to pass on this zone in favor of keeping the shooting pace a little more relaxed. I think this time will be better spent chatting with them and building rapport for the post-sunset shot that I am hoping will be my best version of the shoot.
Zone Four: Light Into Post-Sunset
This is the zone I am most looking forward to shoot in. As you can see above, I already have started to ready my lights even before the sun dipped below the horizon.
The lights visible in the BTS above are both a little overexposed. But you can see their positions. I'll be shooting from just above the horizontal strip light. As in, camera squishing right down into the top side of the light. I tend to like a strip light for fill, as it both wraps well and creates specular highlights in glasses that are pretty easy to hide.
By the way, here's a quick tip on specular highlights in glasses for multi light setups: They are almost always going to be there. There are easy ways to <a href="https://strobist.blogspot.com/2006/04/lighting-101-lighting-for-glasses.html">hide them</a> when using one light source. But it is more difficult with two lights.
Fortunately, most eyeglasses are low-reflection these days. Which means you'll get a dim reflection with a weird color cast. So I'll often lasso that reflection in post, and then use curves to both neutralize the color cast and lower the tonal value. Which is what I did here.
So, the same 1/2 CTO is on the key and I have a 1/2 CTB cooling gel on the fill. This is to create a difference in the warmth of the highlights vs. the shadows. That relative difference will carry forward even if I globally adjust the color balance afterwards. So my shadows will look more real.
Here's my final, along with a few things to think about if you'd like to build a look like this.
First, the sharp-eyed amongst you will notice there is now a third light in the mix. Remember, everything other than the sky in this photo that is not lit by flash will be pure black. So I am using a speedlight (a <a href="https://strobist.blogspot.com/2020/02/hot-shoe-go-to-godox-tt600.html">Godox TT600</a>) out of frame to camera-right, in the back, to scrape the grass and erase some of that black.
Ironically, this light will fill some of the logical visual gaps and help the photo to look less "lit."
Second, it is the fill light that makes this picture. The legibility in the shadows is key to recreating the scene in a way that feels more natural to your eye. The lushness and velvety feel in their clothing in particular (and in the shadows in general) is all down to the fill light.
Third, I love their expressions. Both the impishness and the symmetry. Right about now I am feeling good about foregoing Zone Three and instead pausing to rest and chat. That matters. If you are making good frames, and pausing to relax and chat between looks, you'll often watch as your subjects progress from being just visual pipe cleaners to full-on collaborators.
Don't just blast away. If you find yourself doing that, consider it to be a tell that you are probably too nervous. Which surely won't help things. Take a breath. Relax. Chat.
Remember that you only need for things to come together one time, for a fraction of a second. Create your best odds for that to happen.
Zone Five: Deep Dusk
I felt great about what we had with the Solems at this point. And they told me that they do not like to drive after dark, so I wanted to get them on their way.
But there is a final zone that can we often miss because of external reasons like the above. Shooting with with or into deep dusk can yield beautiful results. The ambient light often gets ethereal and particularly beautiful deep into dusk. And it does so in ways that our eyes cannot perceive, but a long-open shutter can pick up.
If you have time, it is well worth sticking around to experiment with that. After all, other than time, what do you have to lose?
Just remember two things. One, given your subject is in silhouette, your flash will become your new shutter. Don't worry about camera shake. I have shot portraits like this at two or even four seconds. Just hold reasonably still and things might turn out surprisingly great.
And two, since your subject will be in silhouette, remember to bring a small flashlight to use for focusing between frames. You'll need it.
Finally, because of the sensitivity of modern cameras, that deep afterglow can actually be a beautiful light source. All kinds of cool color is happening in blue hour. Set your camera on daylight white balance to see it for what it is.
You can see an example of the results from this technique at the end of this post.
__________
So, those are five different zones of light for you to explore the next time you are out shooting a portrait at sunset.
And again, I'm not saying you need to try for all five. Just always know that they are there for you.
This article was published as an entry in Strobist Lighting Cookbook. New articles and how-to's appear monthly. To receive notifications for new posts, you can follow via email or via Instagram.


