Photographers

Forest of Dancing Trees
1x Blog-Photographers' .
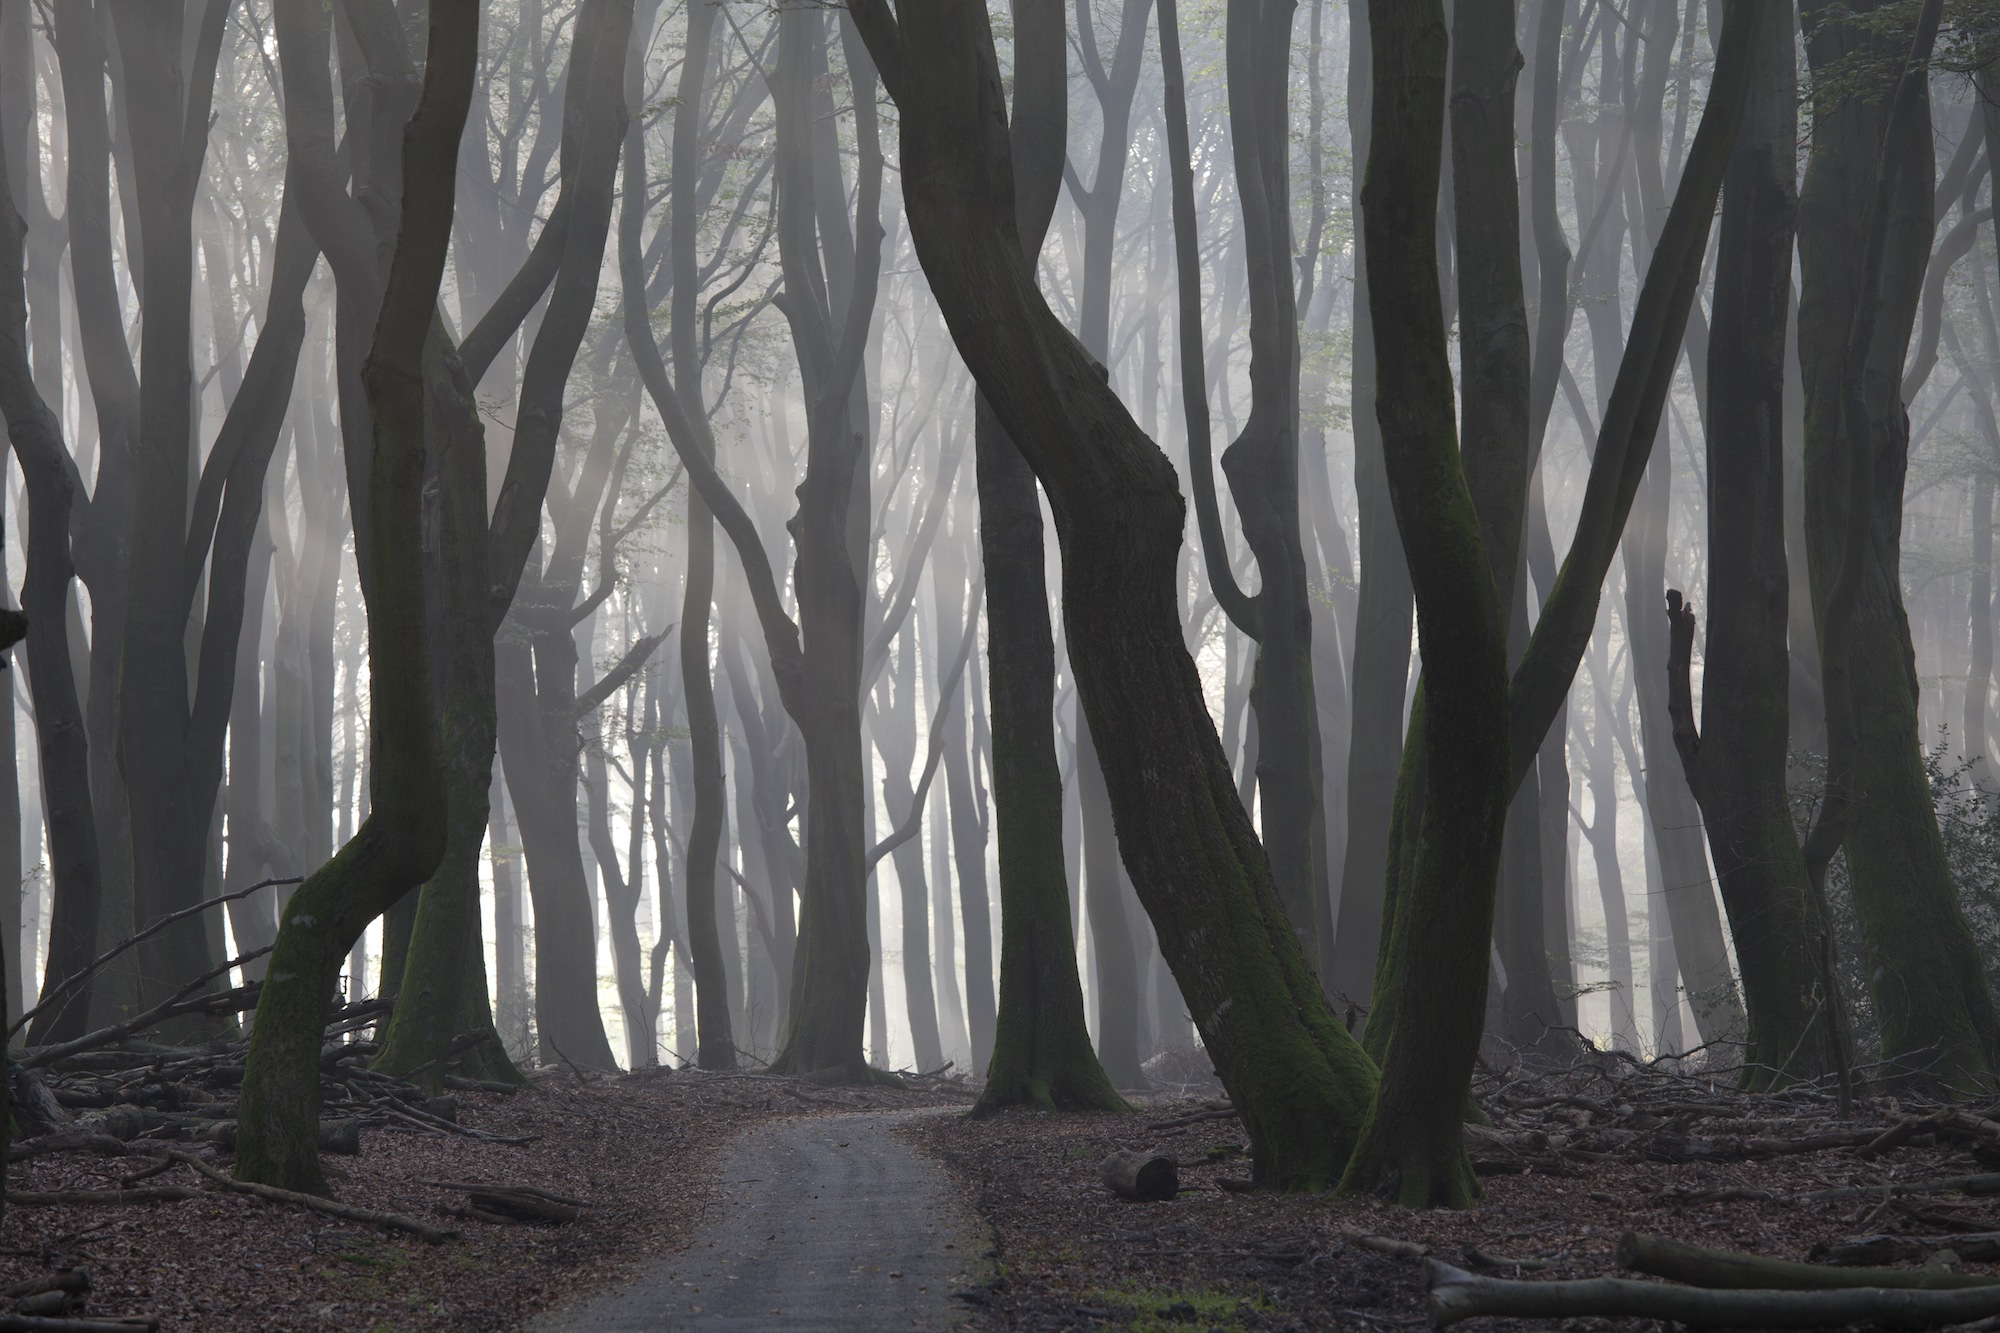
I chose this particular spot because of its composition: the path forms a strong visual starting point and also guides the viewer into the middle of the dancing trees. The filtered light coming in from the left prevented the contrast from being too extreme, and it also created a good balance between the shadows and highlights.
I set up my tripod about 3 feet high (1 meter) to emphasize the height of the trees. I chose a fairly long focal length of 160 mm to compress the trees, and an aperture of f/8 so that the trees in the foreground would be sharp, but the trees in the distance would be much softer. I selected ISO 50 to prevent noise, and then I underexposed the shot by 1 stop to ensure that no highlights would be blown out. Using a low ISO gives me the ability to bring back the shadow details in post-processing without losing image quality.
. '
Speulder is one of the most ancient forests in the Netherlands. It is one of the few natural forests, and was formed during the last ice age. It is well known for the shape of its trees, hence its nickname, “The Forest of Dancing Trees.”
I decided to visit the forest on October 2, 2011, to photograph these notorious trees and their intriguing shapes. I reminded myself to pay close attention to the quality and direction of the light while I searched for an appealing composition — one that would do justice to the forest's nickname.
I chose this particular spot because of its composition: the path forms a strong visual starting point and also guides the viewer into the middle of the dancing trees. The filtered light coming in from the left prevented the contrast from being too extreme, and it also created a good balance between the shadows and highlights.
"I chose a fairly long focal length of 160 mm to compress the trees, and an aperture of f/8 so that the trees in the foreground would be sharp, but the trees in the distance would be much softer."
I set up my tripod about 3 feet high (1 meter) to emphasize the height of the trees. I chose a fairly long focal length of 160 mm to compress the trees, and an aperture of f/8 so that the trees in the foreground would be sharp, but the trees in the distance would be much softer. I selected ISO 50 to prevent noise, and then I underexposed the shot by 1 stop to ensure that no highlights would be blown out. Using a low ISO gives me the ability to bring back the shadow details in post-processing without losing image quality.
POST PROCESSING
I used Lightroom to process the RAW file, and then exported the image to Photoshop for further processing.
1) When I imported the image into Lightroom, I noticed that there was no need to underexpose the image in the first place. This however is very hard to judge looking at the preview on a small LCD on the back of the camera. I moved the Exposure slider up to +1 to achieve a good exposure. At this point, I noticed on the histogram that there was only a very small portion of the highlights blown out, which didn’t concern me.
2) I exported the image to Photoshop and decided, since there was not much color in the image, to go for a dramatic black and white approach, accentuating the shapes of the trees and achieving a mystical effect.
3) I first applied the default Black & White adjustment layer with no further adjustments to it. Then I copied the background layer and set the blending mode to Multiply at 100% Opacity. I double-clicked this layer to access the Advanced Blending dialogue (or go to Layer > Layer Style > Blending Options), and then split the white slider of "This Layer" (alt+click). I moved the left part of the slider back to a value of 0 and the right side of the slider to 159. That way the highlights were much less affected by the Multiply blending mode.
4) Next I used the Color Range feature (Select > Color Range) and selected Shadows in the drop down menu. With this selection active, I created a Levels adjustment layer. Now my selection would automatically be attached to the Levels adjustment layer as a layer mask, adjusting the Levels and affecting the shadows only. I moved the Midtones slider to a value of 1.22 and the Shadows slider to 5 to achieve more detail in the midtones and shadows.
5) Then I merged all the layers.
6) I used the Color Range feature again and selected a highlighted area in the image with the Eyedropper tool. I moved the Fuzziness slider to a value of 80 for a selection to my liking. I used this selection as a layer mask for my newly merged layer and set the blending mode to Screen at 100% Opacity.
7) After that I used the Gaussian Blur filter with a Radius of 30. This resulted in an intense glow in the highlights and a dreamy, mystical effect.
8) I used the Burn tool at 20% Exposure to darken the edges of the image, and then used the Dodge tool to lighten up some of the dark trees a bit.
9) Finally, the image was sharpened with the Smart Sharpen tool at an Amount of 130 and a Radius of 0.4.
BIOGRAPHY
I live in Amsterdam, Netherlands. I work as a profiler behind the customs at Schiphol airport. I also work as a freelance photographer. I started photography 5 years ago. Last year, in cooperation with the organization “Orticola Di Lombardia,” my forest pictures have been displayed in the Modern Art Gallery in Milan, Italy. My work and interviews have been published in several national and international photo magazines/websites. In 2012 I photographed weddings, which also have been published, and since then, the demand for my wedding shots has increased a lot. I very much enjoy combining wedding photography with my personal photography. The latter is mainly focused on nature and portraits and always involves post-processing.
Check out my homepage

