Photographers

Dancers in the SKy
1x Blog-Photographers' .
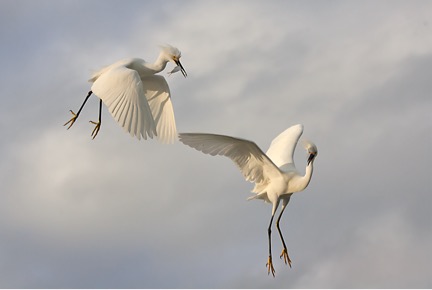
When we are photographing white birds, it is a blessing to have cloudy skies. This eliminates high contrast and shadows across the subjects since the sky acts as a giant lightbox. On the other hand, you need a higher ISO to obtain a decent shutter speed for action, and the low contrast yields less perceivable sharpness. This requires more aggressive post-processing. On top of that, you need to compensate for the low light by using slower shutter speeds than you would under sunny conditions. Even with these disadvantages, we still prefer clouds.
Florida is a birder’s paradise, not only due to the large variety of bird species, but also for the ease of getting close to them. On public beaches, where they see large numbers of people and movement without undesirable consequences for them, they tend to regard us simply as part of the environment, as long as we do not directly threaten them.
Knowing that, it is easy to get good images without having to carry a long telephoto lens and tripod. This results in an excellent setup for catching action quickly, and enables us to move around only lightly burdened. Often we do not carry a flash, and we hardly ever use filters, not even polarizing, because they reduce the shutter speed. For action, you want a fast shutter speed to freeze the movement. For low noise, you want the lowest ISO you can get away with.
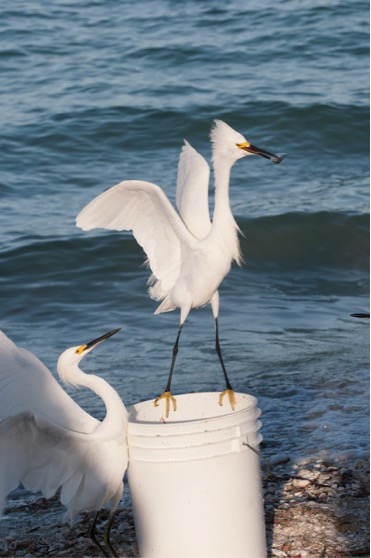
On this particular day we had both clouds and sun. Here is another frame from that day when the sun was out. Although the action may be better because of the presence of food, I much prefer the look of the cloudy one. I am not a big fan of shadows across the body.
This image was taken with a 70–200mm f/4L lens and a 1.4x extender, allowing me to shoot at a 280 mm focal length, an aperture of f/5.6 and a shutter speed of 1/2000 because there was enough light. The one with the cloudy overcast was taken at 1/640 second. Back when these images were captured, I was not comfortable with raising the ISO much higher than 400. Due to improved technology, this has changed.
. '
by Fabs Forns
Snowy egret behavior can be very dramatic. They are graceful and fast, and they can look like dancers in their elegance. Capturing their dance, be it in the air or in the water, is always exciting. However, they are living proof that things are not always what they seem.
When you first see this image, you may get the idea that it is some sort of mating ritual or romance dance. The reality is very different. At the pier, where this image was captured, there are a lot of fishermen trying to get a catch, and there are, of course, fishing buckets with bait and other goodies. Feeding the birds is not allowed, but the birds are free to come and try to steal whatever is in the buckets, be it on the pier or the adjacent beach. Naturally, when there is a chance, the birds will take advantage and go for it. Unfortunately, many of them will see this opportunity at the same time, and very frequently fights break out. In these fights, the egrets go up in the air in the heat of the dispute.
You can see the little thieves in action in the photo below, courtesy of Alfred Forns.
You can see the little thieves in action in the photo below, courtesy of Alfred Forns.
"When we are photographing white birds, it is a blessing to have cloudy skies."
When we are photographing white birds, it is a blessing to have cloudy skies. This eliminates high contrast and shadows across the subjects since the sky acts as a giant lightbox. On the other hand, you need a higher ISO to obtain a decent shutter speed for action, and the low contrast yields less perceivable sharpness. This requires more aggressive post-processing. On top of that, you need to compensate for the low light by using slower shutter speeds than you would under sunny conditions. Even with these disadvantages, we still prefer clouds.
Florida is a birder’s paradise, not only due to the large variety of bird species, but also for the ease of getting close to them. On public beaches, where they see large numbers of people and movement without undesirable consequences for them, they tend to regard us simply as part of the environment, as long as we do not directly threaten them.
"Often we do not carry a flash, and we hardly ever use filters, not even polarizing, because they reduce the shutter speed."
Knowing that, it is easy to get good images without having to carry a long telephoto lens and tripod. This results in an excellent setup for catching action quickly, and enables us to move around only lightly burdened. Often we do not carry a flash, and we hardly ever use filters, not even polarizing, because they reduce the shutter speed. For action, you want a fast shutter speed to freeze the movement. For low noise, you want the lowest ISO you can get away with.
On this particular day we had both clouds and sun. Here is another frame from that day when the sun was out. Although the action may be better because of the presence of food, I much prefer the look of the cloudy one. I am not a big fan of shadows across the body.
This image was taken with a 70–200mm f/4L lens and a 1.4x extender, allowing me to shoot at a 280 mm focal length, an aperture of f/5.6 and a shutter speed of 1/2000 because there was enough light. The one with the cloudy overcast was taken at 1/640 second. Back when these images were captured, I was not comfortable with raising the ISO much higher than 400. Due to improved technology, this has changed.
POST PROCESSING
This image required a little extra work because of the capture conditions.
It was processed in Photoshop and Nik Silver Efex Pro plugin.
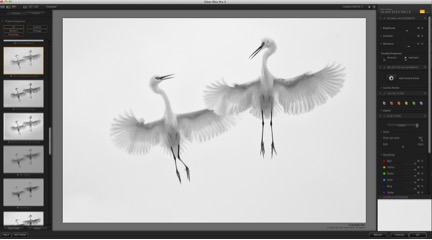
1) First, I opened the image in Photoshop and then exported it to Nik Silver Efex Pro plugin to convert it to black and white. The screenshot below does not have the exact original settings since I did not capture one when I processed this image, and because I now have a newer version of Silver Efex. But I have tried to replicate the adjustments I made back then.
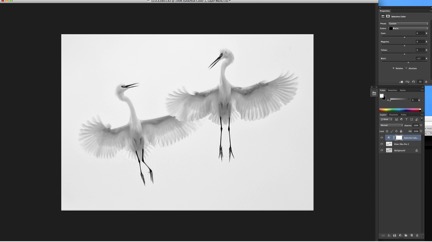
2) Back in Photoshop I used the Crop tool to crop a bit off all four sides. I then applied a Selective Color adjustment layer to add some black to the darker tones throughout the image.
3) I then created another Selective Color adjustment layer, and this time added some black to the Neutrals. Using a layer mask, but inverting it (Command/Control + I), I painted white on the mask over the feet and legs with the Brush (B on your keyboard) to confine the adjustment to only those parts of the image.
4) Next came the sharpening. I flattened the image first since I do not save files with layers. I do not particularly recommend that, but it is the way I work.
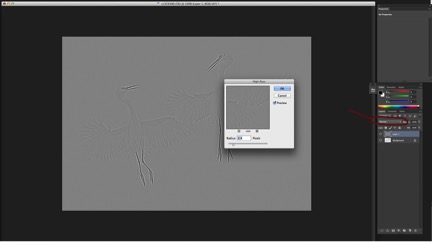
I used a very old method to sharpen: Filter > Other > High Pass. (I am using a smaller file for this tutorial, so in your image you should not see the “halos” that you see here.) A Radius between 1.00 and 2.50 should be good enough. I then changed the layer blending mode from Normal to Overlay (the blending mode menu is highlighted in red below), zoomed the view of the image to 100% and reduced the layer Opacity until I was happy with the amount of overall sharpening.
5) For this image, I think I created two High Pass filter layers: both as described in Step 4, but one was turned into an inverse layer mask. On the inverse mask I painted white over the faces to sharpen them a bit more. To create an inverse layer mask, select the Add Layer Mask icon (the third from the left at the bottom of the Layers Panel) while holding the Alt key. That will give you a black mask, meaning the effect will not be visible unless you paint white on the mask with the Brush while the mask is active in the Layers Panel.
TIPS
1) For this type of “dance” you need a strong wind — 20 mph or better; otherwise, they will just chase each other around.
2) Give your subject(s) a little more room in the lens frame if you are using a zoom lens; they move so fast you may clip a body part if you are in too tight.
3) If you have enough light, you can increase your depth of field by shooting with a smaller aperture. I was not able to go to f/8 in this case, so you do the best you can under the existing conditions.
4) If you can, try to shoot in Manual mode. The background may adversely affect your exposure in the semi-automatic modes, unless you are using spot metering. I, however, avoid this metering for birds in flight.
5) Generally, birds are more active early or late in the day. So, shooting at those times will usually give you better opportunities to catch their interesting behaviors.
BIOGRAPHY
I am one half of a husband and wife team. We live near Miami, Florida, share the same passion for photography and love teaching others how to make the best of every situation. We are both award winning photographers, with Nature's Best and NANPA selecting our work. I just retired as an Adjunct Faculty member at Miami-Dade College, where I was a photography instructor.
Creativity meets experience in this team, and we are always pushing the limits to present new views of the natural world, seeing each subject in a new light and trying to express a mood.
Creativity meets experience in this team, and we are always pushing the limits to present new views of the natural world, seeing each subject in a new light and trying to express a mood.

