Photographers
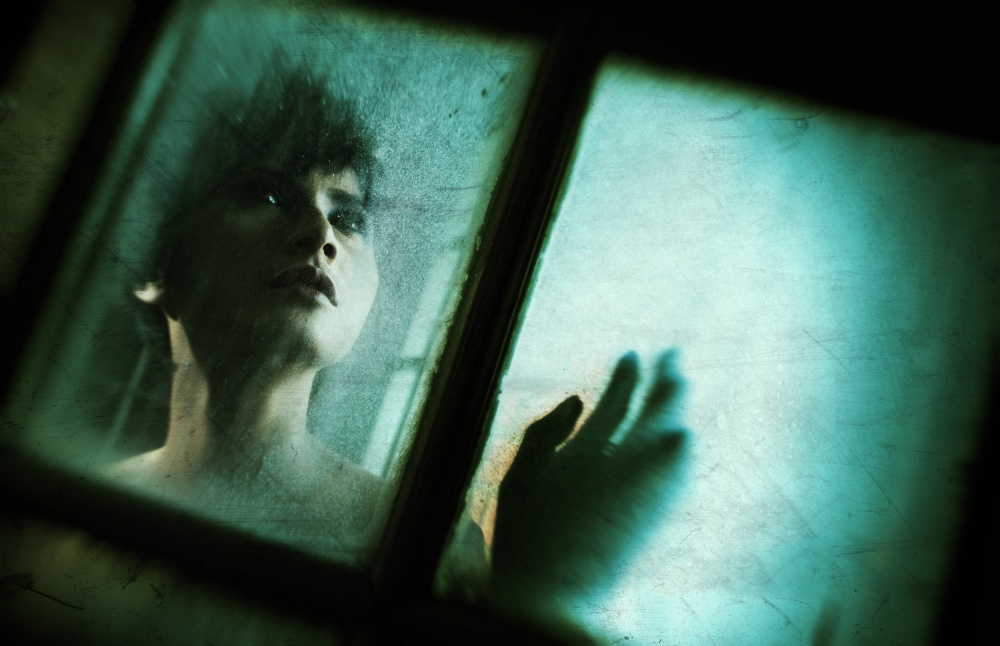
"Stunted": inspired by a thriller movie
1x Blog-Photographers' .
TIPS
BIOGRAPHY
. '
For thriller movie lovers like me, the scene where the victim is cornered with no way out always creates extreme tension. The hopeless condition of the victim makes us wonder what will happen next. Inspired by those scenes, I set up a photo shoot in an old building that was dirty and neglected. Selecting a model who would provide the right expression and creating the appropriate lighting were the key elements in realizing the idea.
I was inspired by one of my favorite thriller movies called P2, directed by Franc Khalfoun in 2007. When I wanted to realize this idea in a photo, the most important factor was to select the correct venue for the concept. So I chose an old abandoned Dutch cultural heritage building in my city.
After scouting the location, I discovered the perfect setting — a dirty window with an old wood frame and windowpanes that were still unbroken. The dirty window gave the impression of desolation and bleakness. I cleaned one of the glass panes where the model would be positioned, using my bare hands to make it look realistic and to create more impact.
The next step was to position the model behind the window. Then I started to take some test shots using only the natural window light that was available, trying different angles to find the best composition. The resulting images were almost silhouettes of the model due to the high contrast lighting conditions. So I decided to provide more light on her face to accentuate her features using an off-camera Canon Speedlite with a honeycomb snoot light modifier. I placed it on the right side of the model (the opposite side of the window light) to compensate for the light coming through the window on her left side. I then took more test shots.
This time the result was better than I expected. After several trials and errors exploring the combination of the Speedlite's position and its power settings, I finally got a picture with the lighting on the model slightly underexposed, producing the desired mood. The Speedlite's position was around nine o'clock and about 6 feet (1.8 meters) away from the model. It was standing at a height of 6 feet (1.8 meters) as well with a honeycomb snoot attached to it, and it was set to manual at 1/8 power.
"I cleaned one of the glass panes where the model would be positioned, using my bare hands to make it look realistic and to create more impact."
After scouting the location, I discovered the perfect setting — a dirty window with an old wood frame and windowpanes that were still unbroken. The dirty window gave the impression of desolation and bleakness. I cleaned one of the glass panes where the model would be positioned, using my bare hands to make it look realistic and to create more impact.
The next step was to position the model behind the window. Then I started to take some test shots using only the natural window light that was available, trying different angles to find the best composition. The resulting images were almost silhouettes of the model due to the high contrast lighting conditions. So I decided to provide more light on her face to accentuate her features using an off-camera Canon Speedlite with a honeycomb snoot light modifier. I placed it on the right side of the model (the opposite side of the window light) to compensate for the light coming through the window on her left side. I then took more test shots.
"After several trials and errors exploring the combination of the Speedlite's position and its power settings, I finally got a picture with the lighting on the model slightly underexposed, producing the desired mood."
This time the result was better than I expected. After several trials and errors exploring the combination of the Speedlite's position and its power settings, I finally got a picture with the lighting on the model slightly underexposed, producing the desired mood. The Speedlite's position was around nine o'clock and about 6 feet (1.8 meters) away from the model. It was standing at a height of 6 feet (1.8 meters) as well with a honeycomb snoot attached to it, and it was set to manual at 1/8 power.
POST PROCESSING
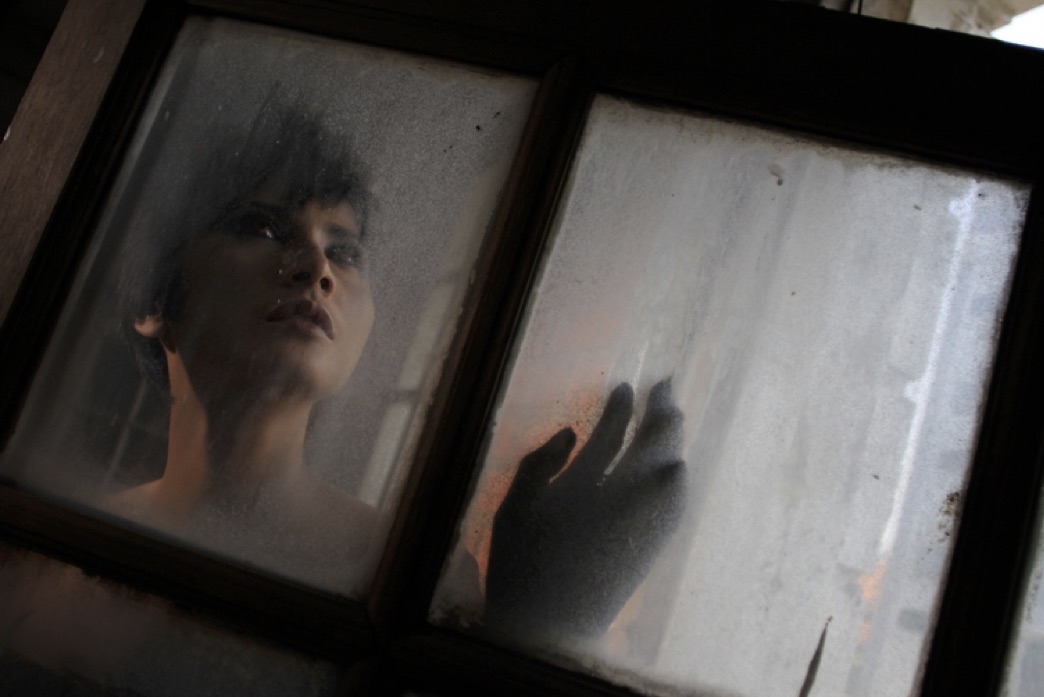
Here is the result with the setup described above, fresh from the camera.
The image was processed in Lightroom, Photoshop, Alien Skin Exposure plugin and Nik Color Efex Pro 4 plugin.
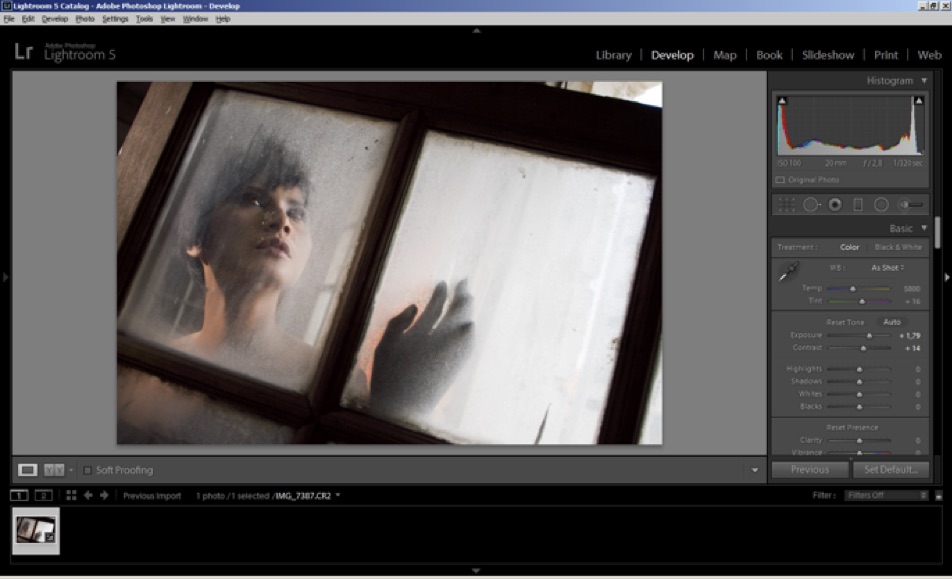
1) Since the original file was in RAW format, I used Adobe Lightroom to convert it to a native 16-bits/channel Photoshop file (PSD) in RGB color mode. At this point, I adjusted the Exposure (+1.79) and Contrast (+14) settings in the Basic panel of the Develop Module. Now the image looked perfect in detail as seen below.
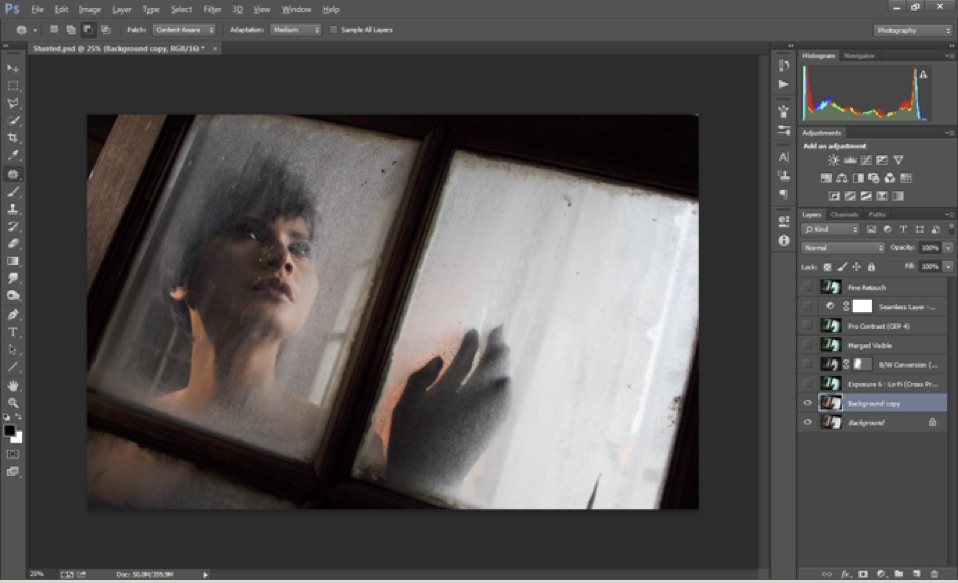
2) I exported the image to Photoshop and then, as I always do, I duplicated the background layer in order to protect the original file.
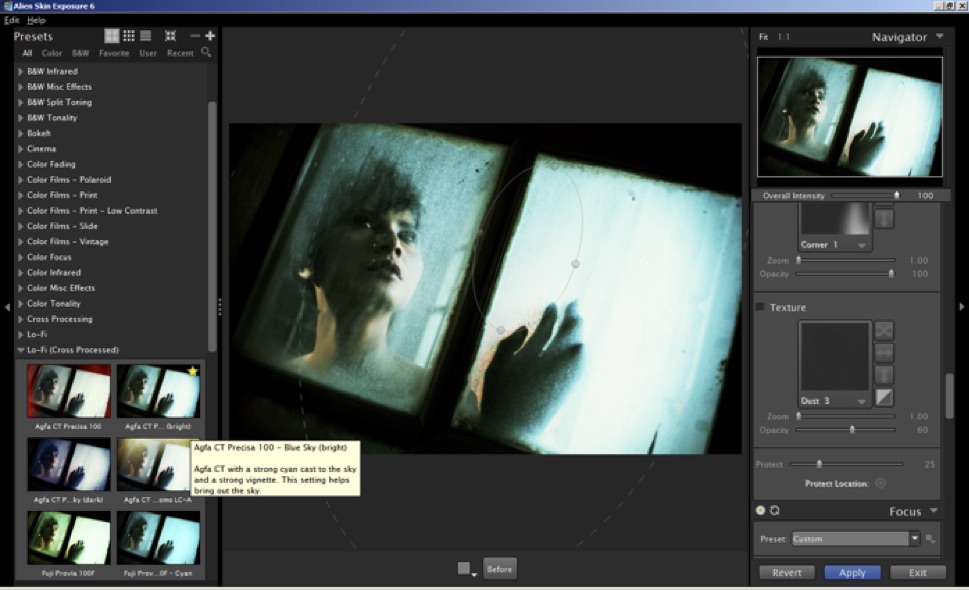
3) The next step was the main processing of the image using Alien Skin Exposure plugin. I applied the Lo-Fi (Cross Processed ) Agfa CT Precisa 100 — Blue Sky (bright) preset to give a strong cyan cast and a vignette effect to the image. I felt that an overall strong cyan toning would emphasize the horror ambience in the image. I then manually modified the preset in the Overall Intensity tab by increasing Zoom to 10 to emphasize the point of interest on the model. I also added a scratch texture to the image so it better resembled a scene in a movie.
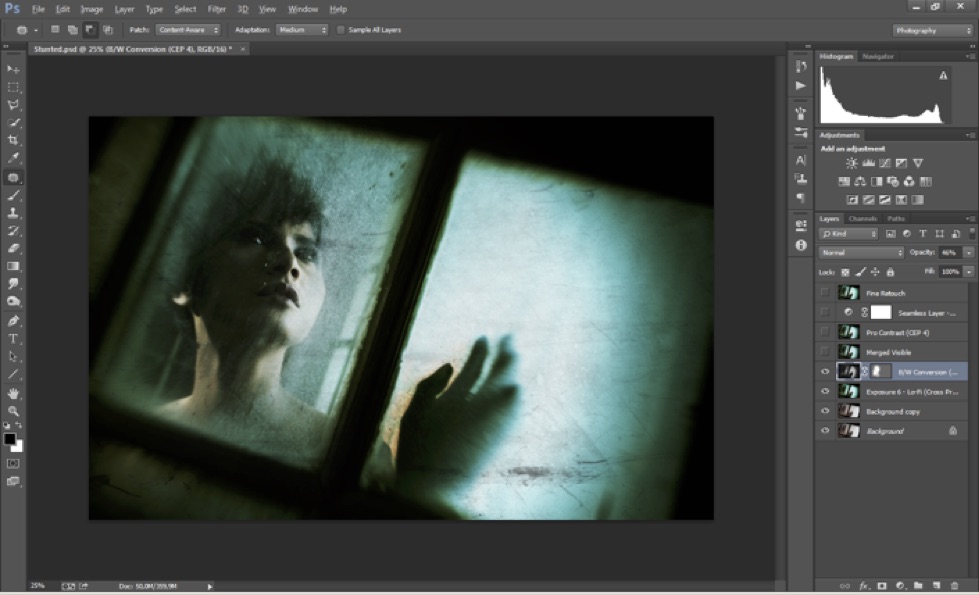
4) The result was as I expected, but the color was still too vivid. Using Nik Color Efex Pro 4 plugin, I converted the image to black and white. Returning to Photoshop, I stacked the black and white layer on top of the Alien Skin Exposure layer in the Layers Panel, set the layer blending mode to Normal and reduced Opacity to 46%, which in turn reduced the overall saturation in the image. A layer mask was applied, and then I painted over the model to slightly reveal the original yellowish color of her skin tone and to give her more dimension.
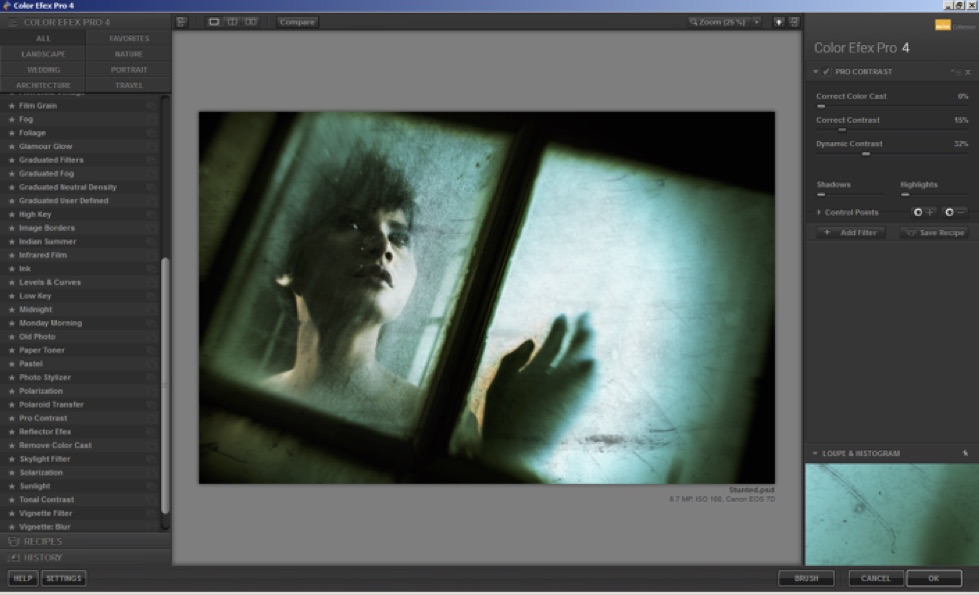
5) My image was 70% finish at this point, so I merged all the visible layers. Returning to Nik Color Efex Pro 4 to boost the contrast, in the Pro Contrast panel I set Correct Contrast to 15% and Dynamic Contrast to 32%.
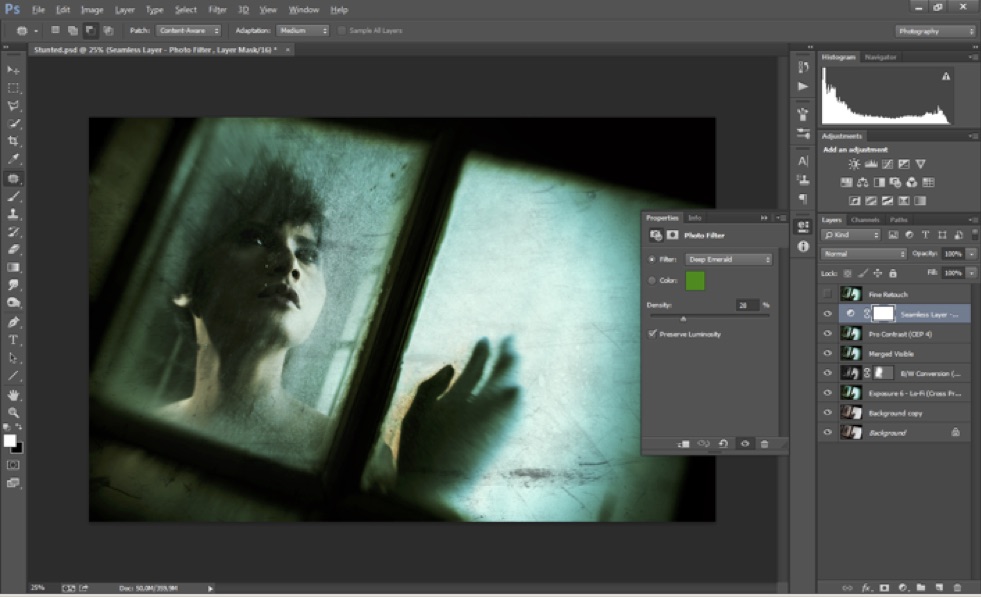
6) I wanted to create a “seamless” layer to blend the colors in the image and make them more even. Back in Photoshop, I applied a Photo Filter adjustment layer, selected the Deep Emerald filter and set Density to 28%.
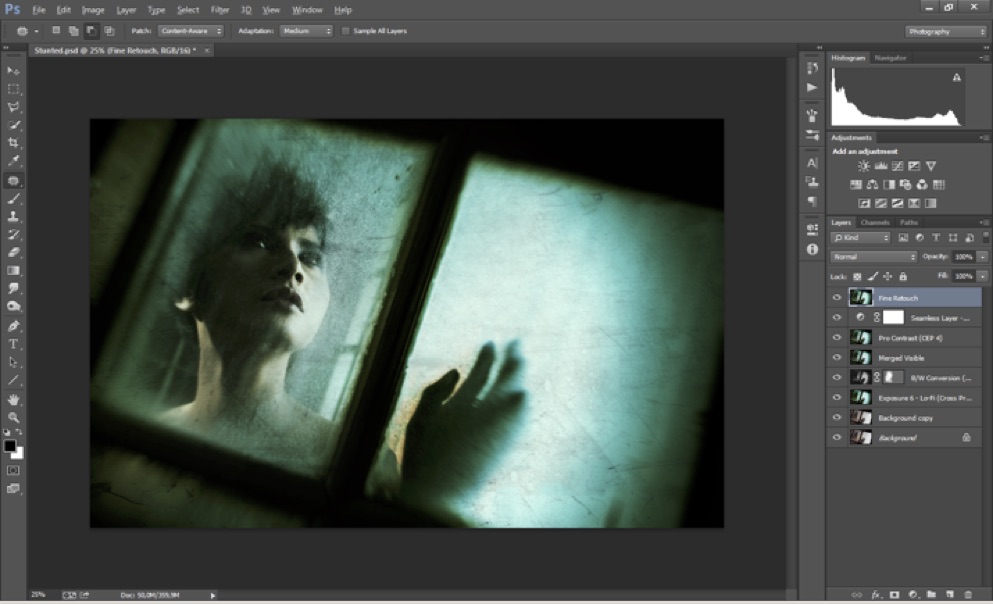
7) The final step was to add a new layer for fine retouching, where I corrected the highlight area around model’s nose, dirty white spots around the cheek and removed some of the scratch texture from the bottom-right area of the image.
TIPS
1) Don't rush when you're setting up the lighting. The position and power setting of the Speedlite was the key in creating the right ambience and mood in this image, so I took the time required to get it right.
2) Please be careful when you add texture layers in post-processing. The random pattern of the texture can sometimes disturb the important areas in the image. In the Alien Skin Exposure plugin, remember to use Protect Location below the Texture tab to remove unnecessary and distracting scratches.
2) Please be careful when you add texture layers in post-processing. The random pattern of the texture can sometimes disturb the important areas in the image. In the Alien Skin Exposure plugin, remember to use Protect Location below the Texture tab to remove unnecessary and distracting scratches.
BIOGRAPHY
I was born in Surakarta, Central Java. I have loved photography since I was in junior high school and got my first analog film pocket camera in 1987. I started taking all kind of scenes that caught my attention. In early 1990, I got my first film SLR camera. At that point, I had a chance to learn serious photography.
The big step came in 2005 when I decided to buy my own digital SLR camera. From that moment on, I have tried to not just take pictures, but to create images — the real ones that evoke an emotional response from the viewer. I learned post-processing on my own from reading books and online tutorials.
I'm very interested in modeling and fashion photography. From the model’s expression, I try to infuse an emotional connection into the photo, whether it is love, desire, longing, fear or any of the thousands of other emotions that can be explored. I enjoy every aspect of creating a photo. Combining the photography technique, the wardrobe, the expression that creates a mood and soul has always been my main objective.

