Tips & Tricks
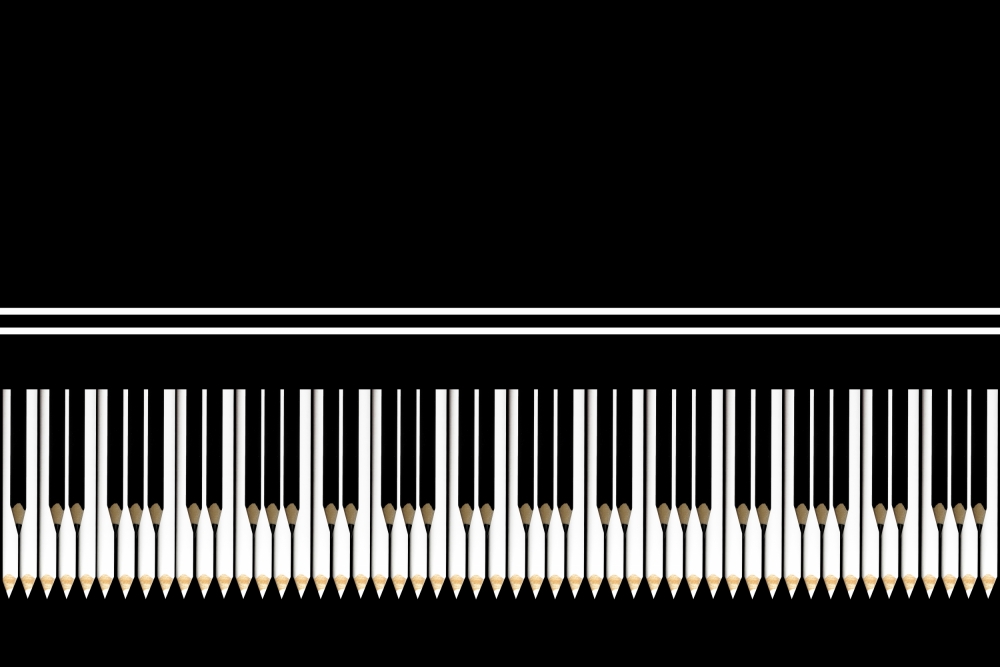
Ebony and Ivory
1x Blog-Tips & Tricks' .
. '
by Udo Dittmann
Inspired by a song and accomplished with two pencils and a light. Yes, a simple idea and an uncomplicated set can indeed produce an ingenious, imaginative creation. It only takes forethought and some post-processing know-how.
After listening to the song “Ebony and Ivory” by Paul McCartney, an idea came to mind: an image of a piano keyboard made out of black and white pencils. I love abstract and still life photography, and I thought that combining the two genres could make an interesting, graphic composition.
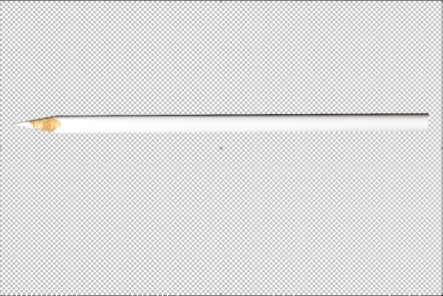
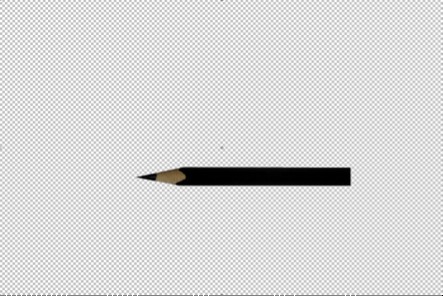
I used a long, white pencil and a short, black pencil to emulate the piano keys. My set consisted of a tabletop and a daylight lamp positioned directly over the table. Using a 180mm lens with my Canon 6D on a tripod, I first shot the white pencil on a piece of black cardboard. Being careful to not move the camera or tripod, I changed the set, placing a black pencil on white cardboard in the exact same spot on the table so that the lighting would match. I chose these opposite color schemes for a specific reason: in post-processing, I would be able to easily extract the pencils from their backgrounds by using a layer mask on each of them.
I intentionally set my camera to ISO 50, f/11, –2/3 stop EV, Aperture Priority mode and RAW format. I wanted the pencils to be tack sharp, which is why I chose to shoot with a relatively small aperture. By setting the camera to Aperture Priority mode, my selection of f/11 dictated that the shutter speed be 1/6 second for the black pencil and 1 second for the white pencil. Long exposures can create noise in the RAW file, so I set the camera’s ISO to its lowest setting of 50, which always helps to reduce noise. As well, I used mirror lockup and a cable release to prevent camera shake.
"I chose these opposite color schemes for a specific reason: in post-processing, I would be able to easily extract the pencils from their backgrounds by using a layer mask on each of them."
I used a long, white pencil and a short, black pencil to emulate the piano keys. My set consisted of a tabletop and a daylight lamp positioned directly over the table. Using a 180mm lens with my Canon 6D on a tripod, I first shot the white pencil on a piece of black cardboard. Being careful to not move the camera or tripod, I changed the set, placing a black pencil on white cardboard in the exact same spot on the table so that the lighting would match. I chose these opposite color schemes for a specific reason: in post-processing, I would be able to easily extract the pencils from their backgrounds by using a layer mask on each of them.
I intentionally set my camera to ISO 50, f/11, –2/3 stop EV, Aperture Priority mode and RAW format. I wanted the pencils to be tack sharp, which is why I chose to shoot with a relatively small aperture. By setting the camera to Aperture Priority mode, my selection of f/11 dictated that the shutter speed be 1/6 second for the black pencil and 1 second for the white pencil. Long exposures can create noise in the RAW file, so I set the camera’s ISO to its lowest setting of 50, which always helps to reduce noise. As well, I used mirror lockup and a cable release to prevent camera shake.
POST PROCESSING
In my opinion, this process was more like a Sisyphean Challenge: at one point, it felt like I would copy-and-paste myself into oblivion! But it does require patience, a great attention to detail and a few indispensable plugins that made my job much easier.
To process the files, I used Aperture, Photoshop Elements 10, Nik Software's plugins Sharpener Pro 3 and Color Efex Pro 4, and onOne Perfect Mask 8 plugin.
1) I’m not a musician. So, I first had to figure out the arrangement of the black and white keys on an actual piano keyboard.
2) I imported the two RAW files into Aperture, and then applied Nik plugins to each photo.
3) For the white pencil, I applied Nik’s Sharpener Pro 3 > RAW Presharpener Filter. I then applied Nik Color Efex Pro 4 > Tonal Contrast set to Highlight 66, Midtone 100, Shadow 10 and Saturation 85. Next, I applied Nik Color Efex Pro 4 > High Key filter (only to the white part of the pencil using Nik U Point technology) set to Glow 66, Dynamic 42, Saturation 28 and Contrast 86. Lastly, I applied Nik Sharpener Pro 3 > Output Sharpener set to its standard values.
4) For the black pencil, I applied Nik’s Sharpener Pro 3 > RAW Presharpener Filter. I then applied Nik Color Efex Pro 4 > Tonal Contrast set to Highlight 66, Midtone 100, Shadow 10 and Saturation 85. Next, I applied Nik Color Efex Pro 4 > Low Key filter (only to the black part of the pencil using Nik U Point technology) set to Glow 50, Standard 30, Saturation 30, Whites 10 and Contrast 100. Lastly, I applied Nik Sharpener Pro 3 > Output Sharpener set to its standard values.
5) In order to extract the pencils from their backgrounds, I applied the onOne Perfect Mask 8 plugin. Using the Pen tool in Remove mode and with all of the Pen tool’s options set to zero, I made a layer mask for each pencil and then erased their backgrounds.
6) I saved each pencil as a PSD file (Save As > white_pencil.psd and black_pencil.psd), and then exported them to Photoshop Elements 10.
7) I needed to do some basic calculations in order to create a new file with the correct dimensions. I decided that my final image would have 51 white pencils, each of them being .39 inches (.99 cm) wide. 51 pencils x .39 inches = 19.88 inches (50.49 cm) would be the minimum width of the new file. So, for a 300 dpi file, I needed the file’s width to be 6000 pixels (20 inches x 300). And because the preferred aspect ratio for printing is 3:2, the new file’s height would be 4000 pixels.
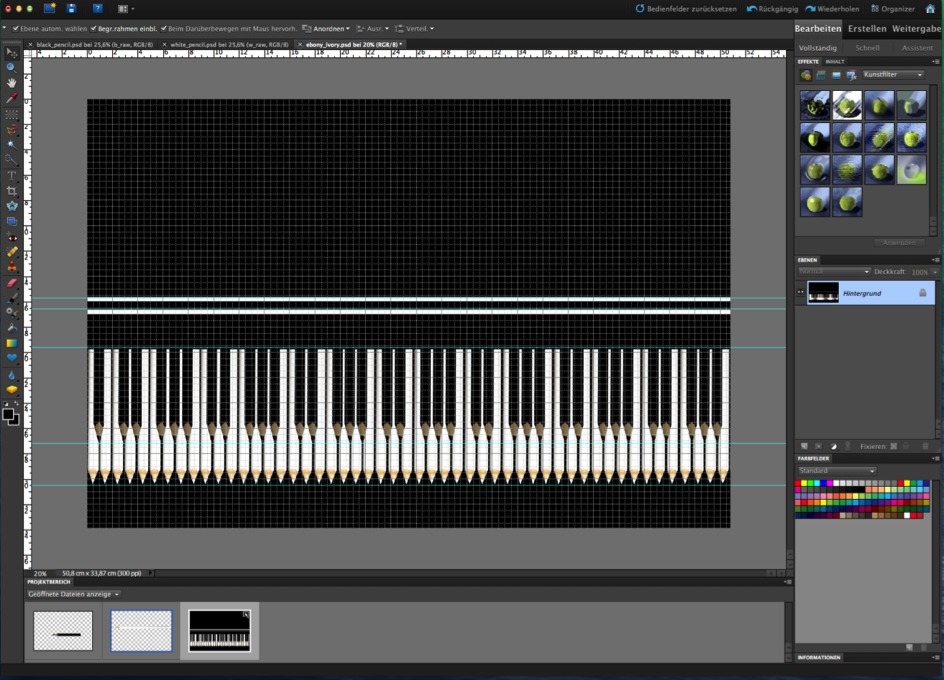
8) I created the new file (File > New) and set its parameters to Width 6000 pixels, Height 4000 pixels, Resolution 300, Color Mode RGB, Background Contents Black. With the new file opened, I also opened both pencil PSD files, and then dragged the black and white pencils onto the new file’s black background. The pencils appeared as layers in the Layers Panel.
9) At this point, I enabled Grids, and I used the Rulers and Guides as well to assist in the alignment of the pencils. I clicked on the white pencil layer, used Transform > Rotate to turn the pencil so that it pointed straight down, and then pressed the Enter key to deactivate Transform. With the Move tool, I dragged the white pencil to the far left side of the background. This was the first piano key.
10) I made 50 copies of the white pencil. I dragged and dropped each of them onto the black background, lining them up side by side from left to right.
11) For the black pencil, I repeated steps 9 and 10, but made 35 copies of the black pencil.
12) I flattened the image and then saved it as a new file so that it could be resized, saved as a JPEG and uploaded for online viewing.
TIPS
1) If you think you have a great idea for a photo, don’t hesitate to try it. Go for it!
2) Use a calibrated monitor. It will generate the most natural results for all colors, including white, black and grey tones. I am currently using the Spider 4 Pro.
2) Use a calibrated monitor. It will generate the most natural results for all colors, including white, black and grey tones. I am currently using the Spider 4 Pro.
BIOGRAPHY
I was born in 1953, and my wife and I live in northern Germany. Over the past three years, I have become a very enthusiastic amateur photographer. I prefer to photograph landscapes, nature, architecture, abstract and (on rainy days) still life. I enjoy editing my photos as much as I enjoy taking them. Currently, my photography gear consists of a Canon 6D and Canon 24–105mm, Tamron 180mm and Sigma 11–22mm lenses. My editing equipment and software consists of a 27-inch iMac, Aperture and Photoshop Elements. I love the onOne and Nik plugins that I mentioned in the tutorial as well. They are intuitive and reliable workflow tools, and I highly recommend them.


