Tips & Tricks

The Pretty Flash Kit makes all the light you’ll ever need
Smoking Strobes-Glamour Photo Tips When starting flash photography, should you buy a complete flash kit or should you rather buy one piece at a time, learn how to use it properly and then move on to the next one? My advise is: go full kit - right now!
Even though I’m telling you things like buy one lens at a time and learn how to use it (I’m currently learning how to use my 3rd lens), I feel like exactly the opposite is true when it comes to lighting gear. For me, shooting with half a flash kit is a bit like driving with half a car - let’s say driving with the front half of the car while the whole back is missing after the bad Terminator has cut it off with his giant axe: Maybe I can even drive with it for a few more meters, at least in Hollywood flicks, but it won’t take me very far, and for sure it’s not a nice experience.
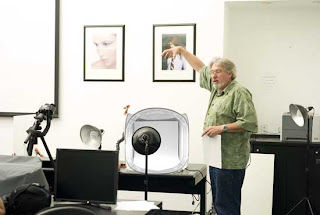
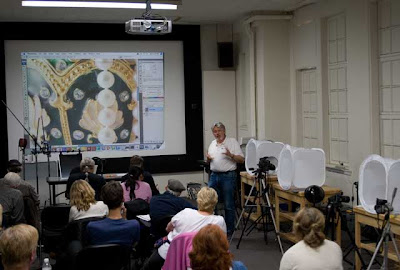
So the question becomes: What is a complete flash kit that enables a beginner to master all sorts of lighting situations? I wrapped my head around this and finally I’d say: just use the stuff that I am using most of the time. I named this kit the “Pretty Flash Kit”. I detail it in this video:
Here’s a breakdown of the Pretty Flash Kit along with some affiliate links:
- 1 Master Flash (for instance SB900 / 580EX II)
- 3 Slave Flashes (SB600 / 430 EX II)
- 4 CTO Filters
- 3 Lightstands
- 3 Multiclamps
- 3 Large Shoot Through Umbrellas
- 1 Collapsible Reflector
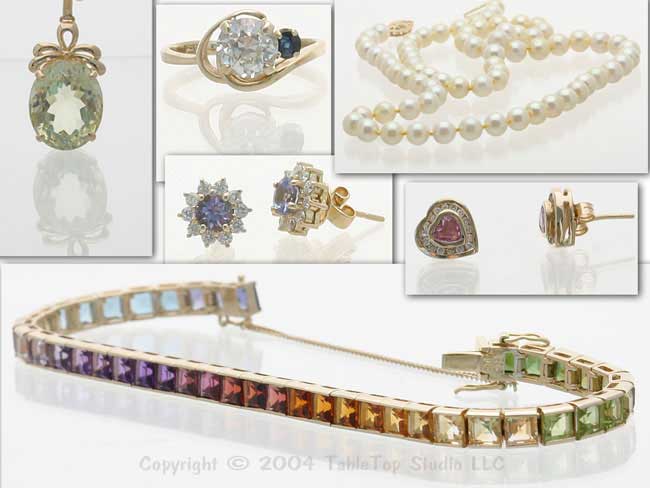
While I am teaching a little bit of an extended flash kit in my advanced classes, I am very confident that the small kit listed above is absolutely complete from a beginners perspective. I mean, if you are just starting out you should anyway just accept with easily manageable assignments that require nothing more than headslapping simple lighting setups, right? Examples for that would be a magazine ad for skincare products that needs just the super soft “powder like” light that our Pretty Flash Kit was throwing onto cousin Ajiao in the example photo. Or a catalogue for the evening wear collection of a high class fashion label for which you might want to capture an intense mood by letting some hard lights hit your model from behind, like you see the Pretty Flash Kit doing in the example photo with cousin HeMin. Are those examples the type of situations that you want to master? Then the pretty flash kit is all you need.
It’s not even expensive. In my opinion for all of those items you can savely try to find the best bargain on ebay and then buy just that. Except for the flashes, quality is not really important with any of those things. This might be a little bit counter intuitive. When it comes to photography gear then a lot of times you’ll hear me say how important the quality is, for instance when it comes to lenses, batteries or radio remote triggers. In those cases the cheap stuff will just not work. But while I’d highly advice you to carefully choose your camera tripod and while I might suggest consider nothing less than expensive Manfrotto tripods for that purpose I don’t see much reason for having your speedlight residing on a luxurious Manfrotto lightstand instead of an affordable Cant-Spell-This-Name lightstand that you grab right from good old ebay. Instead of buying 3 luxurious lightstands better spend your hard-earned bucks on an economy class ticket to Asia, buy 3 super cheapo stands over there and find yourself a luxurious model instead.
I’ll now eat my own dogfood, take my advise myself and head over to expedia to check current the airfares.
I wish you “pretty” good light!
-- Michael
Hey fellow photographer how is it going? I’m Michael Zelbel and in this little video I’m going to walk you through what I call the Pretty Flash Kit, yeah? It’s the - in my opinion -the most affordable option for you to get your hands on a fully blown flash kit for a professional photo production and I call it th “Pretty Flash Kit” because it’s pretty simple, it makes very pretty lighting and it’s working pretty much in any situation. And the reason I’m coming up with that today is because last week Cousin Chris asked in the comment, what kit would I suggest if he wants to start flash photography and here it is.
The kit consists of…, yeah, speed lights – so one master speed light on camera in order to control other speed lights. And it is also working as a fill flash, so it’s one master on camera.
Then three slave speed lights which are positioned around my models, let’s say one main light source, let’s say from the right then, one fill light source, let’s say on the left and one speed light from the background, lighting up the background or throwing light from the back on to the models, so three slave lights.
Then CTO filters for all the speed lights.
Light stands, three light stands for the slave speed lights.
And in order to attach them to speed lights to the light stands, I need 3 shoe-mount multi-clamps.
And then I need 3 shoot-through-umbrellas. But if you go buy them, do yourself a favor, don’t buy three, but buy six or buy nine or whatever gives you discount because those babies break, yeah? If you don’t break your umbrellas, then you are just not shooting enough photos. Get yourself a bunch of them.
And what you need is a little collapsible reflector. That’s so handy for throwing just an extra little bit of light into your model’s faces, so that item is a must! But that’s it that is all you need.
Now the shoot for umbrellas will produce all the soft light you will ever need and the speed lights if you zoom them through a 105mm, they produce all the hard light you will ever need.
So don’t bother buying studio strobes like mono blocks or buying soft boxes, or beauty dishes or ring lights, inflatable flash defusers or any funky little speed light attachments that scatter light all over across the room, no! You don’t need it, what you need is good speed lights. Go for the ones from your camera manufacturer. They are usually working with the lighting system of your camera like the CLS or ETTL and you will want that. And this flashes can zoom. So you can zoom it to 24mm if you want to illuminate the big wall. Or you can zoom to 105mm, if you want to throw a beam light into your model’s backs or something, they just work.
For all the rest of the equipment, go cheap, go find the cheapest stuff that you can get, it will be just fine, promise. Then Chris asked how to operate the stuff and then, and that would be a big topic and I hope a lot of videos on SmokingStrobes give answers to that but let me give you three rules of thumb, three easy rules of thumb here;
Number 1: if you want a hard light, then zoom your speed lights to 105mm and put them 6ft away or 2m away from your model and leave them on automatic whatever, automatic is in your system.
Rule number 2: if you want soft light then, use them throuhg a shoot-through-umbrella zoom then to 50mm then go 1 ft away, or 30cm so come really really close to the model then you have soft light. Again leave it on automatic, on auto pilot and everything will be fine.
Rule number 3: if you really don’t know how to make light, then ask me, now post a link in the comments, show me a photo of the lighting that you want to have that you want to produce. I don’t care, if it is a photo from the biggest, most expensive photo production, I will reverse engineer it and usually you can do it with a couple of speedlights.
So give it a try and post a link, we will have a look at it. All right, that’s it for today, so I wish you a lot of fun with your flash photography and I wish you good light, until next Thursday, bye bye.