Tips & Tricks
'Apart' vision on the woods
1x Blog-Tips & Tricks' .
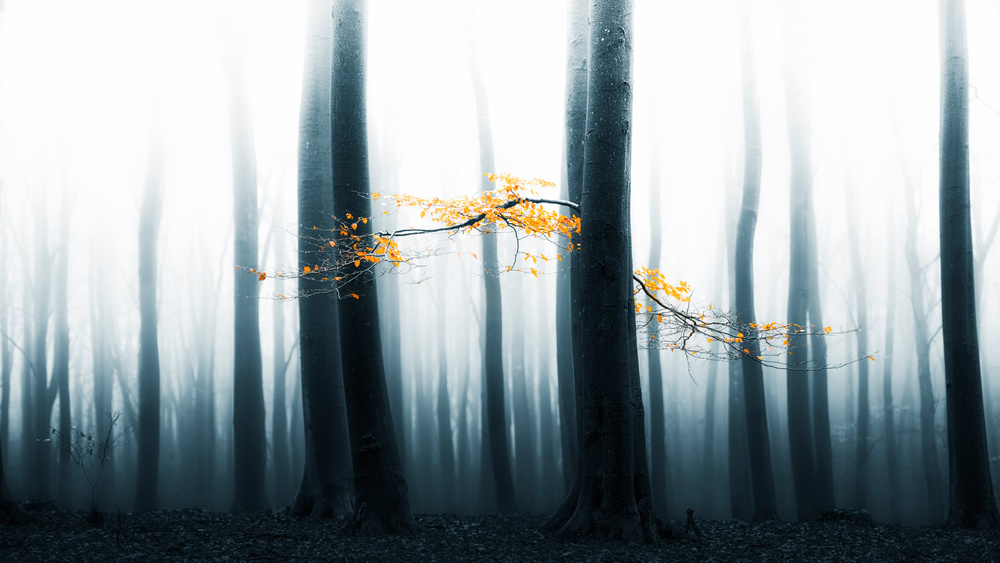
The resulting image comes from one single shot in the forest. The initial photo is a straight shot (without camera movement) that I cropped a little to create a slightly panoramic effect, which helped draw attention to the subject. I didn't have my tripod with me the day I took this photo, and I soon realized that was a mistake: I continued to move deeper into the woods, and the mist and low light forced me to keep increasing my ISO setting. If I had had my tripod I might have used an aperture of f/16 and ISO 100 since there was no wind. There wasn't any special setup for this photo, it just happened. Walking through the forest, I found the yellow tree standing out in high contrast to everything surrounding it.
I believe that when you are in front of a scene, you not only see it, but you also focus your mind on a subject in a particular way, and you feel a range of emotions and have thoughts particular to you, as a result of who you are. Each person is different and each of us will experience a given location in a different way. My point here is that the simple image recorded by the camera is not enough to compensate for the moment I experienced back in the forest when I first saw this tree. Of course I could have retouched the original image, leaving out the blur; everyone would have known that the subject was the yellow tree. But I decided to go a few steps further to emphasize this special yellow tree. It is not only a chromatic contrast, but also the feeling I had that this tree in particular was in some way special, different and apart from all the rest, and not just in color and a higher light value.
So in the end the photo not only highlights the tree, but it also tries (and hopefully succeeds) to make you think beyond the plain reality of a simple tree in the forest. I’m sure your feelings and emotions upon seeing this image are completely different from mine, but if I managed to cause you, as a viewer, to experience more than just an image of a simple tree, then my goal was achieved.
I'm excited to go back into that forest as soon as autumn returns and brings another foggy day. Next time, I'll take a tripod!
. '
by Bonciu Toma
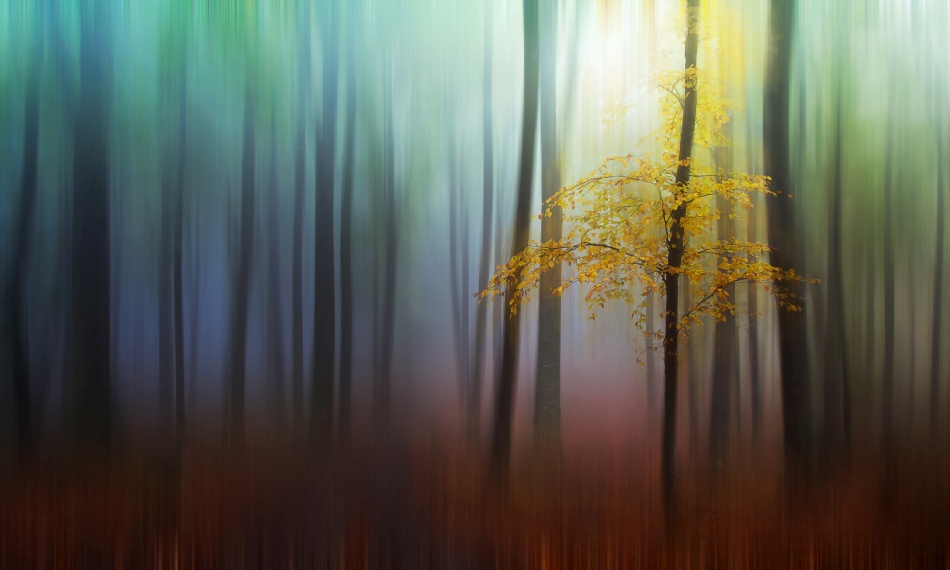
A creative edit inspired by deliberate camera movement singles out a special tree.
I admit that the idea for the final image was not in my mind the moment I took the photo of the tree with yellow leaves. A few months after I took that shot, I started to experiment with intentional camera movement (ICM) during exposure, and it just so happened that I was back in a wooded location. After creating a few vertical movement photos, I began to wonder how it might look with a combination of motion blur and a clear, sharp subject. Unfortunately, it was the start of summer so the forest didn’t look all that appealing. Then I remembered the photo shoot from the same location (back in autumn), so I started to look for a photo that had the right composition and coloring to suit this type of effect. I chose this photo specifically for the pop of yellow in the tree.
The resulting image comes from one single shot in the forest. The initial photo is a straight shot (without camera movement) that I cropped a little to create a slightly panoramic effect, which helped draw attention to the subject. I didn't have my tripod with me the day I took this photo, and I soon realized that was a mistake: I continued to move deeper into the woods, and the mist and low light forced me to keep increasing my ISO setting. If I had had my tripod I might have used an aperture of f/16 and ISO 100 since there was no wind. There wasn't any special setup for this photo, it just happened. Walking through the forest, I found the yellow tree standing out in high contrast to everything surrounding it.
"My point here is that the simple image recorded by the camera is not enough to compensate for the moment I experienced back in the forest when I first saw this tree."
I believe that when you are in front of a scene, you not only see it, but you also focus your mind on a subject in a particular way, and you feel a range of emotions and have thoughts particular to you, as a result of who you are. Each person is different and each of us will experience a given location in a different way. My point here is that the simple image recorded by the camera is not enough to compensate for the moment I experienced back in the forest when I first saw this tree. Of course I could have retouched the original image, leaving out the blur; everyone would have known that the subject was the yellow tree. But I decided to go a few steps further to emphasize this special yellow tree. It is not only a chromatic contrast, but also the feeling I had that this tree in particular was in some way special, different and apart from all the rest, and not just in color and a higher light value.
So in the end the photo not only highlights the tree, but it also tries (and hopefully succeeds) to make you think beyond the plain reality of a simple tree in the forest. I’m sure your feelings and emotions upon seeing this image are completely different from mine, but if I managed to cause you, as a viewer, to experience more than just an image of a simple tree, then my goal was achieved.
I'm excited to go back into that forest as soon as autumn returns and brings another foggy day. Next time, I'll take a tripod!
POST PROCESSING
All of my images are post-processed using Lightroom 3 and Photoshop CS3.
1) I use Lightroom 3 to open the RAW file and edit the exposure and noise in the image. It’s much easier to do this with a RAW file and I prefer doing it in Lightroom before exporting the JPEG for further processing in Photoshop. In this case I had to slightly increase Fill Light since the image was a little dark. In the Develop module, I also applied a Graduated Filter to the bottom part to increase the exposure a little. I then exported the image as a JPEG to Photoshop CS3.
2) I opened the JPEG, unlocked the background layer and made a copy of it. (In my post-processing workflow I like to merge all the modifications into one new layer, while keeping the rest intact. You do this by selecting all the layers and using the PC shortcut ALT+CTRL+E. If the original layer is locked, then the modifications are saved into that layer, which is not what I wanted.)
3) I duplicated the new, merged layer to apply a Motion Blur filter. If you need to use high filter values, the extremities (in the direction of the motion blur) will become a bit too transparent. For this reason it’s best to have an identical image in a layer beneath the one you're blurring to fill in the transparent gaps. The settings for the Motion Blur filter were Angle: 90 and Distance: 366 pixels. The distance you set depends on the resolution of the photo, so you’ll need to experiment to get the effect you want.
4) After applying the Motion Blur, I created a layer mask on the duplicated layer and painted where I wanted the yellow leaves to be visible, without blur. After this I sharpened my high resolution image using a simple method: duplicate the layer, set the new layer's blending mode to Overlay and apply Filter > Other > High Pass with a Radius of 2. I then merged all of the layers and continued working on the photo.
5) I applied three Photo Filter adjustment layers. The first one gave the fog a blue tone; I used a Cooling Filter (82) with 25% Density and painted on the layer mask to apply the blue tone only to the fog. Then I applied a Green Photo Filter with a Density of 32% and again painted on the layer mask to apply the green effect only to the top of the image. The third Photo Filter was Deep Yellow with a Density of 37%, and I painted on the layer mask to apply the effect to only the leaves of the yellow tree.
6) At this point, I needed to darken the rest of the image while keeping the tree and the upper portion of the image bright. To do this I applied several adjustment layers (Levels, Curves and Brightness/Contrast), and on each of them I painted on their layer masks to achieve the desired effect. In the end I applied another Curves adjustment layer to increase the contrast and the intensity of the light on the tree. In doing this I created a gentle blowing effect over the tree. The final step was to apply a Hue/Saturation adjustment layer to make the colors pop.
TIPS
1) This kind of effect is more likely to be successful using forest images or any other environment that is mainly comprised of thin, vertical elements. This creates a more interesting effect when applying the Motion Blur filter. It also helps to have a chromatic contrast between the subject you want to emphasize and the rest of the surrounding scene.
2) Since the effect creates a dreamy/moody/fairytale kind of image, I think it works better in environments that we normally associate with stories, fairies or other magical creatures — places such as forests, plains, mountains, gardens, castle ruins and so on.
3) In the process of retouching the photo I used my Wacom tablet extensively, but you can achieve the same result with a mouse — you just need to be more careful and have more patience.
BIOGRAPHY
I'm from Romania. Photography began as a hobby back in 2005, and from that moment I’ve improved my skills and my understanding of light, composition, color and the ability to express emotions with my photos. My goal is to continue learning something new every day.
I have a passion for nature photography. I think that it has helped me look at mother nature in a different way and taught me how to better respect the surrounding environment. In addition to nature photography, I enjoy taking architectural photos, and I like to create interesting images that in many cases go beyond the simple and actual appearance of a place. I try to make the viewer go a step further than just look at the simple two-dimensional image they have in front of their eyes. If I manage to evoke an emotion in the heart or soul of the viewer, then my goal has been achieved.
I have a passion for nature photography. I think that it has helped me look at mother nature in a different way and taught me how to better respect the surrounding environment. In addition to nature photography, I enjoy taking architectural photos, and I like to create interesting images that in many cases go beyond the simple and actual appearance of a place. I try to make the viewer go a step further than just look at the simple two-dimensional image they have in front of their eyes. If I manage to evoke an emotion in the heart or soul of the viewer, then my goal has been achieved.

