Tips & Tricks
Hummingbird
1x Blog-Tips & Tricks' .
. '
by Leigh Pelton
The hummingbird's wings can beat up to 80 times per second. To the human eye and sometimes in the captured picture, the wings are just a blur. It is the major feature that imposes the difficulty in the task of photographing this amazing bird.
Hummingbirds photographed in flight can be quite stunning but a challenge because of their extremely rapid movements. However, I have found that they are territorials (i.e., they tend to feed, breed and nest in a relatively small area), and a pattern exists in their hourly movements, usually from one food source to another and eventually back again. Therefore, if you position yourself near a food source with your camera ready, the hummingbird will eventually return, and you should be ready to make the picture.
Unfortunately, the relatively small area can be large enough that the time between visits back to where you are situated can be longer than you might wish. I am fortunate in that I live within a two-hour drive of a hummingbird enclosure at the Tucson Desert Museum in southern Arizona, USA. This place is quite large and heavily landscaped, but it restricts the routine of any hummingbird to a smaller area. Therefore, the hummingbird will usually return to where you are sitting every 15 to 20 minutes.
The next issue is the hummingbird’s feeding habits. Some will stick their beak into a flower or feeder, drink for a while and then go away. Others will drink for a bit, pull back, hover briefly and then re-approach the food source to drink again, sometimes repeating this action three or four times. This is the kind of individual that you want — the type that poses for you between feedings.
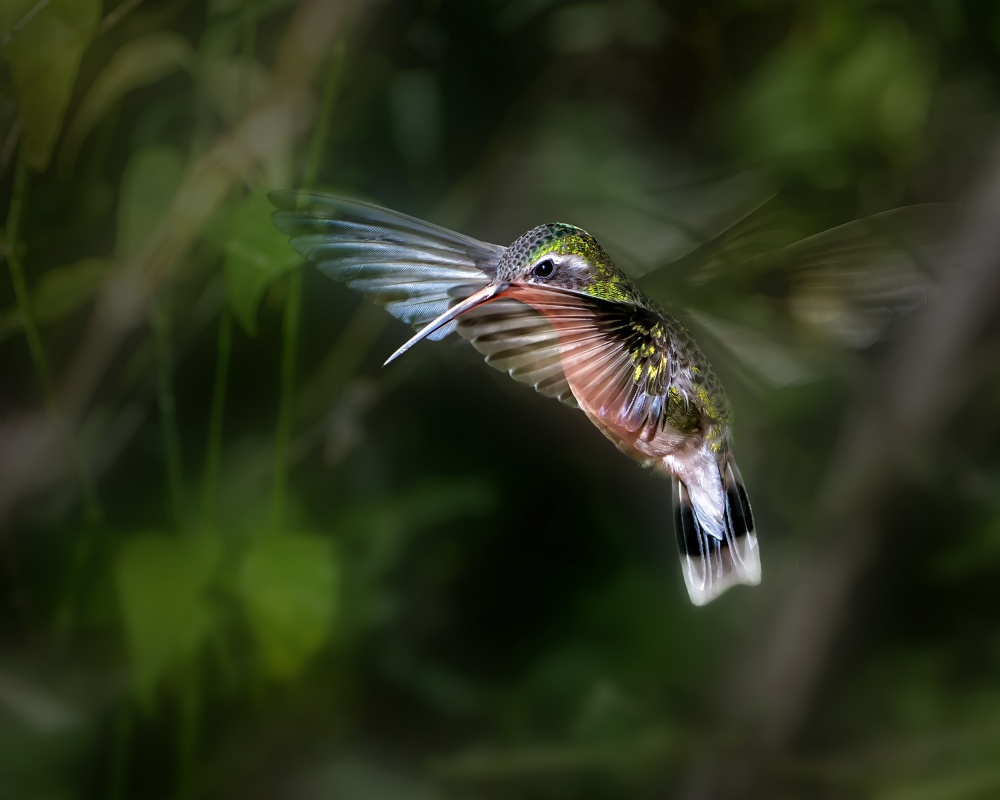
For camera settings I have found that without using a flash, a shutter speed of 1/4000 second will generally freeze the wings. Depending on what the hummingbird is doing, a much slower shutter speed may do as well. Also, you may want some movement to convey action. For this picture, I used a hot shoe flash and set the shutter speed to 1/60 second for synchronization. The flash was set on TTL mode. For the wings to reverse direction they have to first come to a complete stop. It is during this moment that they present the longest image duration to the camera sensor. The flash added a brief burst of additional light, and the wings were frozen by that light in the front. The ambient light during the lapse of the exposure revealed the wings as they moved behind the bird's body. The ambient light also exposed the body of the bird during this time, thereby creating the somewhat transparent appearance of the forward wings. The shot was handheld to allow rapid repositioning as the bird moved about his food source.
Returning from my very first trip to the Desert Museum, I was amazed at how many shots I had taken (maybe three hundred) and how few usable captures I had acquired. Searching on the internet to find out how other photographers did it, I discovered that they do exactly the same thing; they take hundreds of shots and get only a few that have aesthetic value. This, of course, improves with experience, but I'm usually prepared to spend a full day to improve my chances.
"Therefore, the hummingbird will usually return to where you are sitting every 15 to 20 minutes."
Unfortunately, the relatively small area can be large enough that the time between visits back to where you are situated can be longer than you might wish. I am fortunate in that I live within a two-hour drive of a hummingbird enclosure at the Tucson Desert Museum in southern Arizona, USA. This place is quite large and heavily landscaped, but it restricts the routine of any hummingbird to a smaller area. Therefore, the hummingbird will usually return to where you are sitting every 15 to 20 minutes.
The next issue is the hummingbird’s feeding habits. Some will stick their beak into a flower or feeder, drink for a while and then go away. Others will drink for a bit, pull back, hover briefly and then re-approach the food source to drink again, sometimes repeating this action three or four times. This is the kind of individual that you want — the type that poses for you between feedings.
"For the wings to reverse direction they have to first come to a complete stop. It is during this moment that they present the longest image duration to the camera sensor."
For camera settings I have found that without using a flash, a shutter speed of 1/4000 second will generally freeze the wings. Depending on what the hummingbird is doing, a much slower shutter speed may do as well. Also, you may want some movement to convey action. For this picture, I used a hot shoe flash and set the shutter speed to 1/60 second for synchronization. The flash was set on TTL mode. For the wings to reverse direction they have to first come to a complete stop. It is during this moment that they present the longest image duration to the camera sensor. The flash added a brief burst of additional light, and the wings were frozen by that light in the front. The ambient light during the lapse of the exposure revealed the wings as they moved behind the bird's body. The ambient light also exposed the body of the bird during this time, thereby creating the somewhat transparent appearance of the forward wings. The shot was handheld to allow rapid repositioning as the bird moved about his food source.
"Returning from my very first trip to the Desert Museum, I was amazed at how many shots I had taken (maybe three hundred) and how few usable captures I had acquired."
Returning from my very first trip to the Desert Museum, I was amazed at how many shots I had taken (maybe three hundred) and how few usable captures I had acquired. Searching on the internet to find out how other photographers did it, I discovered that they do exactly the same thing; they take hundreds of shots and get only a few that have aesthetic value. This, of course, improves with experience, but I'm usually prepared to spend a full day to improve my chances.
POST PROCESSING
The image was captured in the Nikon RAW format (NEF) and was processed in Adobe Camera Raw, Photoshop CS6 and OnOne Software's Perfect Resize. I also used some Nik Software plugins: DFine 2, Color Efex Pro 4 and Sharpener Pro 3.
1) Adobe Camera Raw was used to lighten the shadows and reduce the highlights. The Clarity tool was used to increase the local contrast within the midtones of the image.
2) The adjusted RAW image was saved in the TIFF file format and opened in Photoshop CS6. Because I wanted to treat the subject and background in a differential way, the use of layers available in Photoshop CS6 made this much easier.
3) The next step was to crop the image. The Crop tool in Photoshop CS6 displays a variety of compositional guides. My favorite is the Golden Spiral (Fibonacci Spiral). Unfortunately, it is only suitable for certain subjects since it tends to position the subject close to the edges. Here, since the focal point of the subject was his eye, it would have shoved his back wings off the right side of the frame. I wanted a close-up composition, and I wanted to show the back wings. As a result, none of the guides seemed to help, so I was left with merely my own compositional judgment.
4) I applied the Nik Dfine 2 plugin. This reduces noise that might be present, and I typically use it as a routine in my workflow, especially if I've done substantial cropping.
5) I used the program Perfect Resize (by OnOne Software) to resize the image back to the pixel dimensions needed for a 16×20 inch print, in a new layer.
6) A flower stem that partially blocked the view of the bird was removed in Photoshop CS6 (my camera bag now contains a small pair of clippers), using the Quick Selection tool and the Content-Aware Fill feature. I did this in small sections of the image to keep the “Content Aware” as local as possible. After that, I further cleaned up the photo using the Clone Stamp tool around a 75% Opacity setting for smoother results.
7) I opened the image in Nik Color Efex Pro 4 plugin. Here, I applied Color Contrast filter in a new layer to accentuate the colors of the hummingbird. Then, I added another layer using the Tonal Contrast filter to adjust the Highlights, Midtones and Shadows. This can all be done on only one layer, but I prefer to do this separately so that I can adjust the Opacity settings of each of these layers, if needed. I tend to overdo each of these effects when I'm in Nik Software and then reduce the amount of the effects when I'm back in Photoshop CS6, using the Opacity slider for each one of these layers. It's easier to reduce the effects of the Nik filters in Photoshop than it is to go back into the Nik plugins and increase them.
8) Satisfied with the result, I added a white layer mask to the top layer and painted black on the mask over the background area to block out those previous adjustments. I only wanted it applied to the hummingbird.
9) I created a new combined layer (Ctrl/Cmd+Alt+Shift+E) to preserve the previous layers. Then, I inverted the layer mask from the previous layer created in Step 8 and applied this masking to the new combined layer. This action allowed me to mask the hummingbird and make changes to the background without affecting the bird.
10) The background was extremely busy and tended to compete with the subject. But I wanted to keep some of the detail of the environment since the hummingbird with his double set of wings looked a bit like a fairy in a garden. Also, I like to give the viewer more to look at than just the main subject. I think it's important to let the viewer enjoy the main subject, wander around the environment a little and then return to the main subject. To do this, I added a Curves adjustment layer. Here I lowered mainly the midtones until I achieved a lower brightness relative to the hummingbird.
11) I added another combined layer (Ctrl/Cmd+Alt+Shift+E) to apply a blur filter to this new layer. I re-masked the bird and applied the Gaussian Blur (Filter > Blur > Gaussian Blur). Other blur tools may do as well or better, but I have a slight preference for Gaussian. Here I adjusted the blur to my suiting.
12) I saved all of these adjustments as a “master” copy, then flattened all of the layers (merging them) and saved the image as a “flattened” copy. I like to keep both, the master and the flattened copy, in separate files in case I have to make changes later.
13) Sharpening was the final step. Sometimes I only apply it to the main subject in my flattened file, via masking, but in this case it wasn't necessary because the background was blurred sufficiently. I used the Local Contrast filter in the Nik Sharpener Pro 3 tool menu. This is a relatively mild sharpener and presents less of that unattractive, gritty look to those people who like to pixel dive.
TIPS
For me, there are two important tips for nature and wildlife photography:
1) Know your subject's behavior patterns.
2) Be patient.
1) Know your subject's behavior patterns.
2) Be patient.
BIOGRAPHY
I live in the greater Phoenix area in southern Arizona. In my day job I'm an aerospace engineer working on the space side of things; however, I've always been fascinated by animals. So, when my interest in photography returned with the emergence of the digital cameras, wildlife and nature photography became a logical mix.
I started with a Nikon Coolpix, then changed to a Nikon D70 DSLR, followed by a D700 and currently I use a D800. With the purchasing of the D70 I began reading as much as possible about digital photography and photography in general and acquired the software Photoshop Elements. Starting with this program I began the long road of learning software skills, which is an art in itself. I'm now semi-proficient in Photoshop CS6.
I started with a Nikon Coolpix, then changed to a Nikon D70 DSLR, followed by a D700 and currently I use a D800. With the purchasing of the D70 I began reading as much as possible about digital photography and photography in general and acquired the software Photoshop Elements. Starting with this program I began the long road of learning software skills, which is an art in itself. I'm now semi-proficient in Photoshop CS6.

