Tips & Tricks
Me with My Loneliness
1x Blog-Tips & Tricks' .
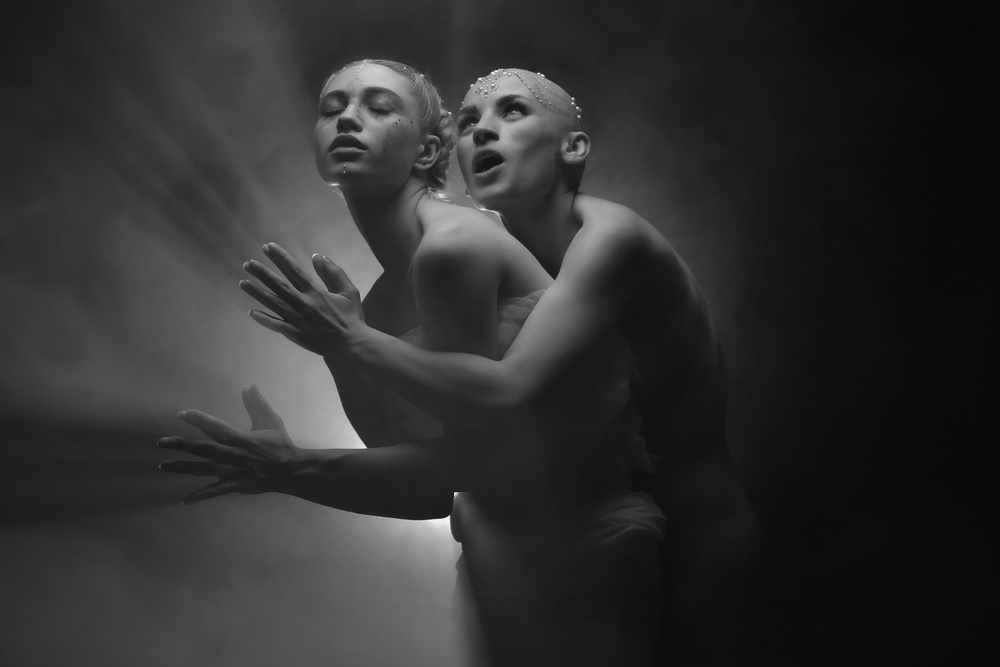
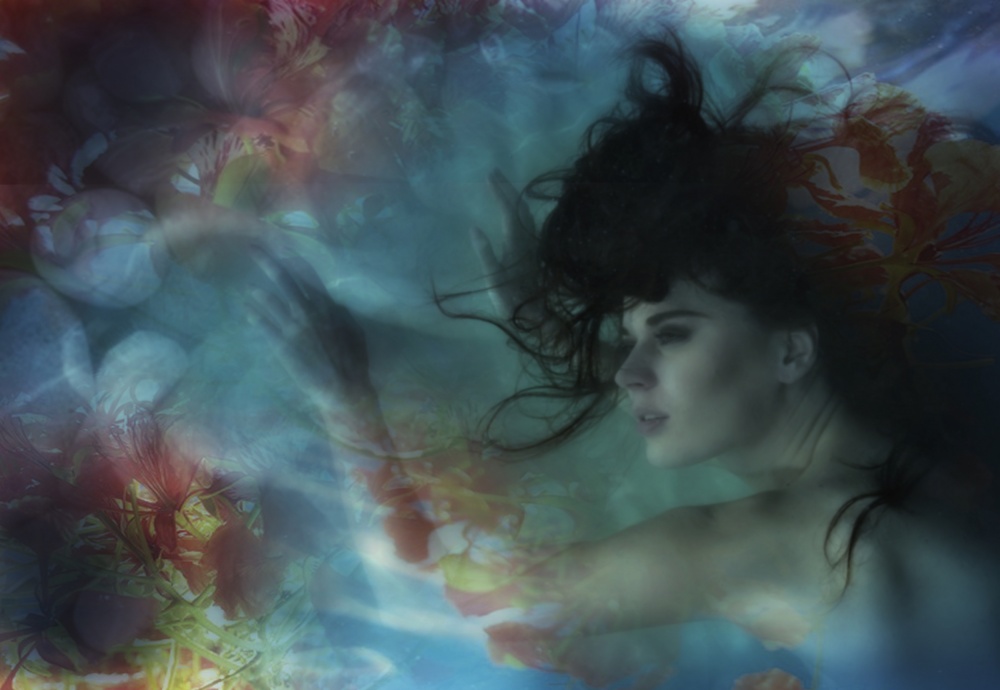
This photo was taken during a workshop with photographer Kenvin Pinardy, so the day and location were already set. As I was shooting, I could tell that the model was getting into the mood or maybe even entering some other sort of dreamworld as she posed underwater. So I tried to convey that emotion in the image, and if possible, make it a bit dramatic.
“Me with My Loneliness” was shot in a swimming pool. By the way, all of my underwater images are made in a swimming pool. It's always best if the water depth exceeds the height of model. This one was taken in an area that was about 10 feet (3 meters) deep. Ten feet is a perfect depth since it isn’t too deep, but it still provides a good amount of space for a model to freely move around and express her emotions through her poses.
The amount of experience a model has dictates how naturally he or she will pose underwater. Some models hesitate at the thought of being underwater, which always results in unnatural poses and, consequently, unusable photos. On this photo shoot there were many photographers in the pool waiting for the model to jump in. As soon as she was in the water, she appeared very content in the different environment, as if she felt so free and peaceful. Despite all the flashes firing and the many cameras aimed at her, she still seemed to be enjoying herself and her imagination.
The challenge in a situation like this is in getting the image that you envisioned before the session started. There are so many different poses and expressions, and most of them will not coincide with your plan. Therefore, when you're photographing a model underwater, I suggest that you plan on taking many images; at least some of them will most likely match your vision.
Another aspect of underwater photography to consider is visibility. It was unfortunate that the visibility on this day was not so good; it was only about 6.5 feet (2 meters). So in order to get a great photo, I had to reduce the distance between the model and myself as much as possible. To do this, I decided to use a wide-angle lens to try to reduce the distorted filter effect that water causes, allowing me to get closer to the model.
This photo was taken in southern Jakarta, Indonesia, where the sun is shining almost every day of the year. It was shot around noon, when there is more than enough sunlight, even 10 feet below the water's surface. However, as I previously mentioned, the water quality was not ideal for good visibility, and even though I was using a wide-angle lens to get closer to the model, I still needed underwater lighting to obtain sharp images. The artificial lights helped in that regard, but they also introduced another issue: a high level of noise and backscatter, which is caused by the lights reflecting off particles floating in the water, creating numerous white specks in the frame. So the direction of the lights is important to avoid capturing all of those white dots. I used two strobes, and they were directed in such a way to keep the backscatter to a minimum. I should also add that those white flecks of light in the water could add drama to the photo, and this did happen in some of my other images. So just be aware that they could easily appear if you need flash to illuminate the scene, and that way you can plan accordingly.
Of all the images I shot, this frame stood out because it best conveys the model's expression. While I was processing the image, I could feel the freedom, the feeling of her being on her own, content and peaceful, but at the same time feeling lonely. It is true that this is my interpretation of her emotion; what she felt at the time may be even deeper than that. She is a good model, and I realized while I was photographing her that it was better to follow her emotions and poses than to instruct her how to pose in order to get the image I had envisioned. Most often this is the best way to obtain real expressions and believable emotions.
. '
by Johannes Oei
I have loved painting since I was in high school, and this is why I started studying fine art photography. Painting allows me to express myself to my viewers, so it was a natural step for me to use photography to express my ideas and feelings in a similar way.
It's unfortunate that I have such limited time off work. There aren’t many occasions when I can make time to take photos. So this photo is one from my photo archives; I have been collecting images ever since I dove into the art of photography.
This photo was taken during a workshop with photographer Kenvin Pinardy, so the day and location were already set. As I was shooting, I could tell that the model was getting into the mood or maybe even entering some other sort of dreamworld as she posed underwater. So I tried to convey that emotion in the image, and if possible, make it a bit dramatic.
"Ten feet is a perfect depth since it isn’t too deep, but it still provides a good amount of space for a model to freely move around and express her emotions through her poses."
“Me with My Loneliness” was shot in a swimming pool. By the way, all of my underwater images are made in a swimming pool. It's always best if the water depth exceeds the height of model. This one was taken in an area that was about 10 feet (3 meters) deep. Ten feet is a perfect depth since it isn’t too deep, but it still provides a good amount of space for a model to freely move around and express her emotions through her poses.
The amount of experience a model has dictates how naturally he or she will pose underwater. Some models hesitate at the thought of being underwater, which always results in unnatural poses and, consequently, unusable photos. On this photo shoot there were many photographers in the pool waiting for the model to jump in. As soon as she was in the water, she appeared very content in the different environment, as if she felt so free and peaceful. Despite all the flashes firing and the many cameras aimed at her, she still seemed to be enjoying herself and her imagination.
"Therefore, when you're photographing a model underwater, I suggest that you plan on taking many images; at least some of them will most likely match your vision."
The challenge in a situation like this is in getting the image that you envisioned before the session started. There are so many different poses and expressions, and most of them will not coincide with your plan. Therefore, when you're photographing a model underwater, I suggest that you plan on taking many images; at least some of them will most likely match your vision.
Another aspect of underwater photography to consider is visibility. It was unfortunate that the visibility on this day was not so good; it was only about 6.5 feet (2 meters). So in order to get a great photo, I had to reduce the distance between the model and myself as much as possible. To do this, I decided to use a wide-angle lens to try to reduce the distorted filter effect that water causes, allowing me to get closer to the model.
"The artificial lights helped in that regard, but they also introduced another issue: a high level of noise and backscatter, which is caused by the lights reflecting off particles floating in the water, creating numerous white specks in the frame."
This photo was taken in southern Jakarta, Indonesia, where the sun is shining almost every day of the year. It was shot around noon, when there is more than enough sunlight, even 10 feet below the water's surface. However, as I previously mentioned, the water quality was not ideal for good visibility, and even though I was using a wide-angle lens to get closer to the model, I still needed underwater lighting to obtain sharp images. The artificial lights helped in that regard, but they also introduced another issue: a high level of noise and backscatter, which is caused by the lights reflecting off particles floating in the water, creating numerous white specks in the frame. So the direction of the lights is important to avoid capturing all of those white dots. I used two strobes, and they were directed in such a way to keep the backscatter to a minimum. I should also add that those white flecks of light in the water could add drama to the photo, and this did happen in some of my other images. So just be aware that they could easily appear if you need flash to illuminate the scene, and that way you can plan accordingly.
Of all the images I shot, this frame stood out because it best conveys the model's expression. While I was processing the image, I could feel the freedom, the feeling of her being on her own, content and peaceful, but at the same time feeling lonely. It is true that this is my interpretation of her emotion; what she felt at the time may be even deeper than that. She is a good model, and I realized while I was photographing her that it was better to follow her emotions and poses than to instruct her how to pose in order to get the image I had envisioned. Most often this is the best way to obtain real expressions and believable emotions.
POST PROCESSING
Because I had narrow visibility during the photo session, it was important to shoot in RAW format.
This a photomontage of a few photos, all of which were processed in Adobe Camera Raw, Photoshop and Nik Software's Color Efex Pro plugin.
1) In Camera Raw, Clarity was increased to the maximum setting to accentuate the details in the photo. Although, by enhancing the details, I also increased the digital noise.
2) In the Detail tab, I adjusted the Noise Reduction Luminance and Color settings to decrease the high level of noise that the Clarity slider accentuated in Step 1.
3) The image was exported to Photoshop. First I used the Crop tool to crop the image tighter and make it more dramatic. This created the impression that she was nude. The rest of the post-processing in Photoshop was putting the compilation together by arranging other images on top of this one.
4) I most often process my photos using Nik Software's plugins. For this image I chose to use Nik Color Efex Pro plugin. I applied the Glamour Glow filter, which is very helpful in increasing drama. I also applied a Blur filter.
5) The next step is to decide what needs to remain blurred and what needs to be sharpened in the image. Back in Photoshop, I selectively applied the High Pass filter only to specific areas that I wanted to be sharp, using a layer mask and painting on the places that required sharpening.
This photo is a composite using Normal layer blending modes. For this reason, it is important to use layer masks with care. That's the part I like to refer to as “putting feeling” into the frame. It's like putting the precise amount of salt on a meal — taste and emotion play equally important roles.
TIPS
1) The model has to be very relaxed and deep into her imagination.
2) Details are so important, so shooting in RAW format is crucial to accentuate the details in post-processing.
3) I used the High Pass filter to boost the details that needed more emphasis.
2) Details are so important, so shooting in RAW format is crucial to accentuate the details in post-processing.
3) I used the High Pass filter to boost the details that needed more emphasis.
BIOGRAPHY
I am a scuba diver. I became serious about photography when I realized that I wanted to show the world what can be found in the ocean. I started learning by just asking around. Only when I met photographer Peter H. van Bragt did I really start to understand how to manually adjust my camera. I then continued with basic photography classes in Jakarta, Indonesia, where I live. It was there I met Mr. Alex Hamzah, who shared lots of theories and case studies with me.
My first camera was Canon IXUS, a compact digital camera, which I used for underwater photography. A year later I switched to a Canon G12 with Ikelite underwater housing and two strobes. A couple of years after that I got my first DSLR — a Canon 5D Mark III with Nauticam housing.
I have loved painting since high school, but unfortunately I never had any opportunities to study this art. One day I was told that photography is a process of painting with light. Since then I started to search for paintings and photographs that I have dreamed about. It was Kenvin Pinardy's classical glamour photographs that I found and felt in love with, especially now that I know the basics of how to use simple tools in Photoshop.
My other dream is to be a professional photographer and incorporate artwork into it.

