Tips & Tricks
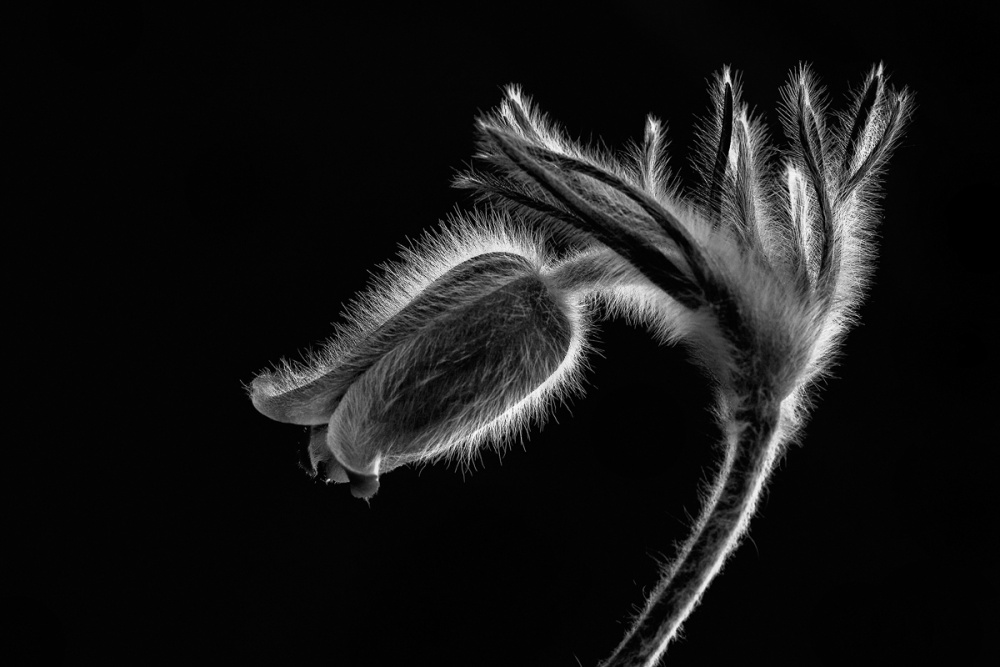
Artistic rendition of the beautiful Pulsatilla flower
1x Blog-Tips & Tricks' .
These magnificent flowers only appear in March. When the winter is over and the first warm days arrive, they bloom for one or two weeks only. On the last day of March 2008, I went out for a photo shoot one hour before sunset. I took my camera, macro lens, tripod and a black T-shirt. It was a quiet walk in the diffused twilight.
My goal was not to capture the usual macro shot with a long depth of field: I wanted an artistic rendition. I wanted to emphasize the shape of the flower, and especially the fluffy white hairs. Therefore, I did not use flash and the depth of field was just enough to keep the silhouette sharp while the rest of the flower remained slightly out of focus.
I tried several test shots with various apertures, such as f/2.8, f/4.0 and f/7.1, until I found one that satisfied me (f/7.1). There was only a slight breeze, but it was enough to make it very difficult to take a sharp picture. I held my breath as I focused on the enlarged flower in the viewfinder, and I took pictures during the brief moments that I was relatively still. I tried three or four more compositions, each time with varying aperture values to ensure that some of them came out sharp.
I was lying in the grass with the camera on the ground. The black T-shirt served as my backdrop, which I had positioned behind the flower before I started shooting. To capture the delicate hairs on the flower, I needed to shoot toward the setting sun, so I searched for the right angle to include the black background and to catch a perfect backlight on the flower. The lens was facing the sun, but I made sure it was not pointing directly at it to prevent lens flare.
In macro photography, I never use autofocus. I set the correct magnification, and then move the camera back and forth until I find the focus through the viewfinder. For this particular dynamic composition, I rotated the camera about 30 or 40 degrees counterclockwise to place the vertical stalk on a diagonal in the frame. I tried three compositions and each worked well, but this particular shot was definitely the best. I took this photo during my second of three photo sessions to capture this flower, which shows that good preparation pays off!
My belief is that photography is a visual art form, and the artwork should convey the message visually without words. I have never understood why a photo needs a title. I only use titles for organizational purposes, which is why I named this image after the Latin name for the flower. I let the photograph speak for itself.
I used Adobe Camera Raw to make the first basic adjustments, and then I exported the image to Photoshop to finish the processing.
1) I selected the best image among the different versions — the one with the best sharpness and depth of field.
2) In Camera Raw, I converted the photo to black and white by removing all Saturation.
3) I then sharpened it with Sharpening using the default settings, except that I increased the amount of sharpening from 25 to 45.
4) I then increased the Contrast significantly until almost all of the background turned black. The photo was underexposed almost 2 stops, so the white hairs were not overexposed, even with a lot of contrast added.
5) I opened the image in Photoshop and used the Clone Stamp tool to darken some lighter areas of the background.
6) The last touch was to adjust the white hairs. I went to Image > Adjustments > Selective Color, selected Whites, and then decreased the Black to –40% to make the white hairs brighter. I made sure to not overexpose the hairs! To brighten the hairs like this, you must make sure that the image is not in Grayscale mode, but in RGB Color mode! (Image > Mode > RGB Color)
7) Finally, I saved the photo as a TIFF.
8) I also created a smaller 1200×800 pixels version for the internet. Instead of just making a smaller version and applying an Unsharp Mask filter, I used a specific method to make the image sharp. I first created a 2400-pixels-wide image, went to Filter > Sharpen > Sharpen, and applied it twice to the image. I then resized the image to the final size of 1200x800 pixels. I find this method gives better results for smaller versions that will be displayed on the web.
. '
To create a unique photograph, you must communicate to the viewer the special aspects of your subject that resonate with you. A passerby most likely would not have perceived this flower the way I have portrayed it here. Through my own composing and technical translation, I managed to convey my own distinct impression of the flower.
This photo is a result of years of visits to a particular hillside near my home village in Boghis, Salaj, Romania, where these flowers bloom in early spring. I have seen many brilliant photos of the greater pasque flower (Pulsatilla grandis), but the basic idea and inspiration to create my own interpretation of them originated when I discovered that they grow in my home village.
These magnificent flowers only appear in March. When the winter is over and the first warm days arrive, they bloom for one or two weeks only. On the last day of March 2008, I went out for a photo shoot one hour before sunset. I took my camera, macro lens, tripod and a black T-shirt. It was a quiet walk in the diffused twilight.
My goal was not to capture the usual macro shot with a long depth of field: I wanted an artistic rendition. I wanted to emphasize the shape of the flower, and especially the fluffy white hairs. Therefore, I did not use flash and the depth of field was just enough to keep the silhouette sharp while the rest of the flower remained slightly out of focus.
"I held my breath as I focused on the enlarged flower in the viewfinder, and I took pictures during the brief moments that I was relatively still."
I tried several test shots with various apertures, such as f/2.8, f/4.0 and f/7.1, until I found one that satisfied me (f/7.1). There was only a slight breeze, but it was enough to make it very difficult to take a sharp picture. I held my breath as I focused on the enlarged flower in the viewfinder, and I took pictures during the brief moments that I was relatively still. I tried three or four more compositions, each time with varying aperture values to ensure that some of them came out sharp.
I was lying in the grass with the camera on the ground. The black T-shirt served as my backdrop, which I had positioned behind the flower before I started shooting. To capture the delicate hairs on the flower, I needed to shoot toward the setting sun, so I searched for the right angle to include the black background and to catch a perfect backlight on the flower. The lens was facing the sun, but I made sure it was not pointing directly at it to prevent lens flare.
"For this particular dynamic composition, I rotated the camera about 30 or 40 degrees counterclockwise to place the vertical stalk on a diagonal in the frame."
In macro photography, I never use autofocus. I set the correct magnification, and then move the camera back and forth until I find the focus through the viewfinder. For this particular dynamic composition, I rotated the camera about 30 or 40 degrees counterclockwise to place the vertical stalk on a diagonal in the frame. I tried three compositions and each worked well, but this particular shot was definitely the best. I took this photo during my second of three photo sessions to capture this flower, which shows that good preparation pays off!
My belief is that photography is a visual art form, and the artwork should convey the message visually without words. I have never understood why a photo needs a title. I only use titles for organizational purposes, which is why I named this image after the Latin name for the flower. I let the photograph speak for itself.
POST PROCESSING
Usually my landscape photos need a lot of post-processing, but this type of macro requires very minimal intervention. Unfortunately, the T-shirt was not dark enough in some areas of the frame, so the majority of the processing was to create a uniform and solid black background behind the flower.
I used Adobe Camera Raw to make the first basic adjustments, and then I exported the image to Photoshop to finish the processing.
1) I selected the best image among the different versions — the one with the best sharpness and depth of field.
2) In Camera Raw, I converted the photo to black and white by removing all Saturation.
3) I then sharpened it with Sharpening using the default settings, except that I increased the amount of sharpening from 25 to 45.
4) I then increased the Contrast significantly until almost all of the background turned black. The photo was underexposed almost 2 stops, so the white hairs were not overexposed, even with a lot of contrast added.
5) I opened the image in Photoshop and used the Clone Stamp tool to darken some lighter areas of the background.
6) The last touch was to adjust the white hairs. I went to Image > Adjustments > Selective Color, selected Whites, and then decreased the Black to –40% to make the white hairs brighter. I made sure to not overexpose the hairs! To brighten the hairs like this, you must make sure that the image is not in Grayscale mode, but in RGB Color mode! (Image > Mode > RGB Color)
7) Finally, I saved the photo as a TIFF.
8) I also created a smaller 1200×800 pixels version for the internet. Instead of just making a smaller version and applying an Unsharp Mask filter, I used a specific method to make the image sharp. I first created a 2400-pixels-wide image, went to Filter > Sharpen > Sharpen, and applied it twice to the image. I then resized the image to the final size of 1200x800 pixels. I find this method gives better results for smaller versions that will be displayed on the web.
BIOGRAPHY
I’m a landscape photographer from Boghis, Romania. I have been attracted to images ever since I was a child. My passion for mountains and wilderness also played an important role in my becoming a photographer.
I never really learned photography in a formal setting — only by viewing others' photos and by practicing a lot. I was interested in photography for a long while, but I became much more serious about it in 2003.
I never really learned photography in a formal setting — only by viewing others' photos and by practicing a lot. I was interested in photography for a long while, but I became much more serious about it in 2003.
The art of Marc Adamus had a major influence over my own work.
As a photographer, I’m not interested in becoming popular, winning awards or earning money. Nowadays there are so many photographs around, and I try to emphasize the things that I think are missing in other people’s photographs. My goal is to create a fine art portfolio with quality photos based on my creative interpretations.
As a photographer, I’m not interested in becoming popular, winning awards or earning money. Nowadays there are so many photographs around, and I try to emphasize the things that I think are missing in other people’s photographs. My goal is to create a fine art portfolio with quality photos based on my creative interpretations.

