Tips & Tricks
How to make Unique Mountain Night Sky Images
1x Blog-Tips & Tricksby Editor Yan Zhang
Mountains have been a dominated theme in my landscape photography. They not only present the most magnificent landscapes on the earth, but also set great mental and physical demands for photographers to climb them and to take pictures of them. During my recent trip to the United States in June 2018, together with my fellow photographers, I visited two spectacular mountain areas in California – Ritter Range of the Sierra Nevada and Yosemite National Park, and made a few unique mountain photographs.
In this article, I would like to share my experience of how to make unique mountain night sky images: from the planning prior to the trip, the field shooting techniques, to the post processing. While this tutorial takes two specific cases to demonstrate my methodologies and techniques, it can be applied as a general night photography guide in other mountainous environments.

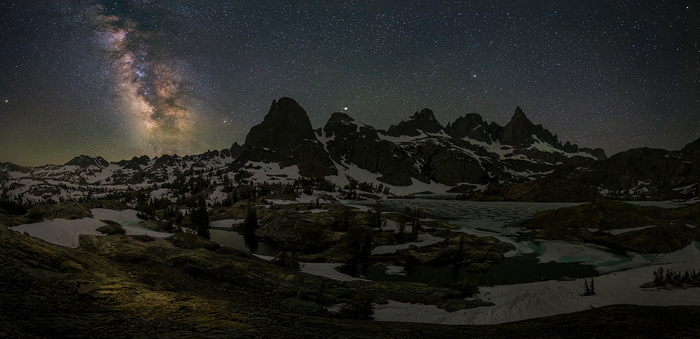
Night sky over Minaret Lake
result of 18 vertical shots from Nikon D850 and lens 14-24mm f/2.8 on 17mm focal length.
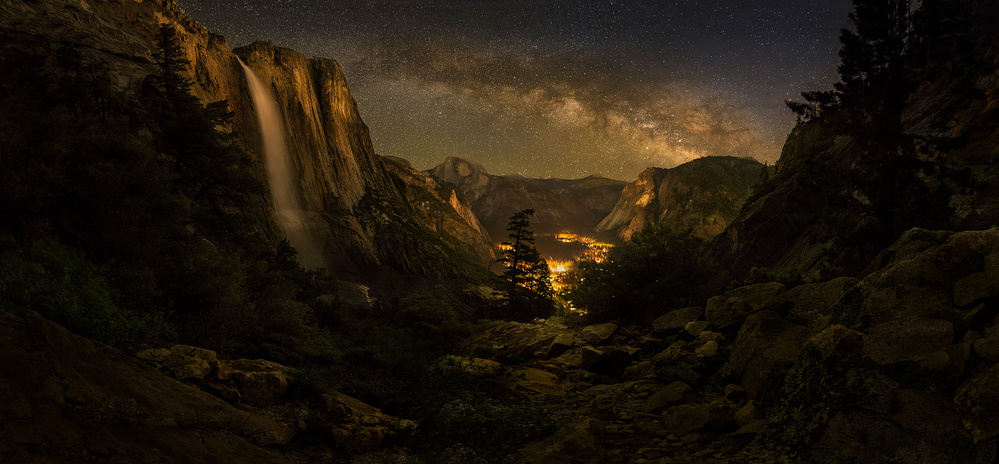
Night sky over Upper Yosemite Falls
result of 16 vertical shots from Nikon D850 and lens 14-24mm f/2.8 on 18mm focal length.
Planning
The two locations I went to were Minaret Lake and Upper Yosemite Falls. Minaret Lake is a lake in a remote back country in Eastern Sierra. In order to get there to undertake photography, we eventually undertook a three-days backpacking trip. Upper Yosemite Falls, on the other hand, is a popular tourist scene in Yosemite National Park, which can be reached in two hours through a well-marked trail. But the spot that we took our shots was an unknown viewpoint off the trail and just discovered by one of my fellow photographers very recently.
Before our trip started, we realised that the weather for our trip period was rather flat – sunny every day without changes, which meant that we would not have a chance to get dramatic sunrises and sunsets. But on the other hand, it also implied that we would have clear sky nights in these areas. So we decided to focus on the night photography in these two mountain areas.
For mountain night sky photography, a critical array of variables must be taken into account, such as moon rise and moon set times, darkness starting and ending times, the Milky Way appearance, and the mountain peak altitude, etc., because all these factors would significantly affect our photography outcomes.
Obviously planning was the first task to achieve our photography goals, for which, using a photography app would be greatly helpful.
Nowadays there are a number of photography apps available in the market, but personally I prefer the app Planit! for Photographers (Planit! for short), which is the most comprehensive one in terms of all kinds of functionalities.
Since I had been to Minaret Lake in 2013, I knew where would be a desirable shooting location. To make our plan as precise as possible, we used Planit! to set our preferred camera location and the scene location that included Minaret peaks into the frame. Then by sliding the time-bar, the app would automatically show the prediction of the Milky Way appearance position in relation to the pre-defined composition.
The following two screenshots show our plan for photographing Minaret Lake.


Plan 1 shows that on 8 June 2018, the moon rise would occur at 2:26am, while the Milky Way’s visible period would be from 10:09pm (7 June 2018) to 3:41am. So we would know that the best time to take our night sky shots with the Milky Way appearance would be around 10:30pm on 7 June 2018 to 2:20am (before moon rise) on 8 June 2018. But from the 3D viewfinder prediction of Plan 1, we also knew that in order to have mountain peaks in the middle of the frame, we probably had to wait around 2:00am to take our shots when the Milky Way was getting closer to the peaks.
Also note that in Plan 1, we set our focal length 5mm, as we planned to shoot landscape panorama to cover about 150 degrees of the view.
For photographing Upper Yosemite Falls, we also did the plan using Planit!, as showed from the following two screenshots.


According to Plan 2, we knew that on the 10th of June 2018, from 10:14pm the Milky Way would start to be visible; it would cross over the sky above the Half Dome; and most interestingly, it would form a beautiful Milky Way bridge between two mountain edges. This scene exactly was what we tried to capture.
Tip 1: Basically, app Planit! needs Internet connection to generate a photography plan. If one plans to go to a place where he/she has never been before, he/she can firstly generate an initial plan using Planit! before the trip, not necessary to be very precise. Then once arriving at the location, he/she can easily refine the plan without Internet connection, because the location map was already uploaded in the initial plan.
Into the fields
Shooting in the field was the most critical and complicated process for our entire photography mission.
Starting from the trail head in the early morning of the 7th of June 2018, we hiked more than six hours to reach Minaret Lake in the afternoon. After setting up our tents, we climbed to the cliff edge marked as the camera location in our Plan 1, where we further refined our shooting location in relation to the mountain surroundings and the Milky Way position.
 Minaret Lake in daytime.
For our second photography place, going to the camera location of Upper Yosemite Falls was a less than two hours hike along Upper Yosemite Falls trail, except that the last part of the hike was off the trail. We arrived at our viewpoint in late afternoon on 11 June 2018.
 Upper Yosemite Falls in daytime.
Having the plans set up earlier via Planit!, it did not take me too long to find appealing compositions in these two viewpoints. Since both places presented breathtaking vista scenes, I decided to take panorama photographs, for which, I would shot in portrait format with multiple frames, using my Nikon D850 camera and lens 14-24mm f/2.8.
However, to execute the procedure successfully, there were two key issues we would have to carefully consider: focusing and the exposure.
Tip 2: I do not recommend to use a panorama plate for shooting panorama images during a mountain photography trip, simply because the weight of the backpack is critical to affect our movement in the mountains. Instead, with a sound field shooting method, one can achieve a high quality panorama image from series of shots through the photo merge function in Photoshop.
Focusing
Focusing in the dark is usually difficult and easy to make a mistake. During these two photography actions, since we arrived at the field in the afternoon, I was able to set my camera focus, and took a number of test shots before dark, to make sure all details of the scene were correctly in focus. After that, I simply secured my tripod and camera in place and waited till the night fell.
On the other hand, finding correct focal points in the scene was tricky and extremely important. We should be aware that after dark, the focal points could be quite different from those in daytime due to the different apertures we may use in daytime photography.
For night sky photography, there has been a rule of thumb saying that we could focus on infinity to make the stars clear. While this is true in general, we should be also know that this rule would not applicable for our night photography when near foregrounds were included into the frame.
In our situations here, both scenes of Minaret Lake and Upper Yosemite Falls contained rich foreground details that I would like to include in my final images, and some parts of the foregrounds were quite close to my camera location, i.e. less than two meters. Focusing on infinity would lose the sharpness of these near foregrounds.
So instead of focusing on infinity, I used hyperfocal distance to decide the focus area in the scene. Since I would use aperture f/2.8 to shoot during the night, and use focal length between 16mm – 18mm, the hyperfocal distance would be between 2.9m – 3.6m, that is, I set my focal point to areas 2.9m – 3.6m away from my camera, respectively. Then I also knew that the near acceptable limit would be 1.5m – 1.8m, i.e., half of the hyperfocal distance, which also defined the nearest foreground distance I could include in the frame.
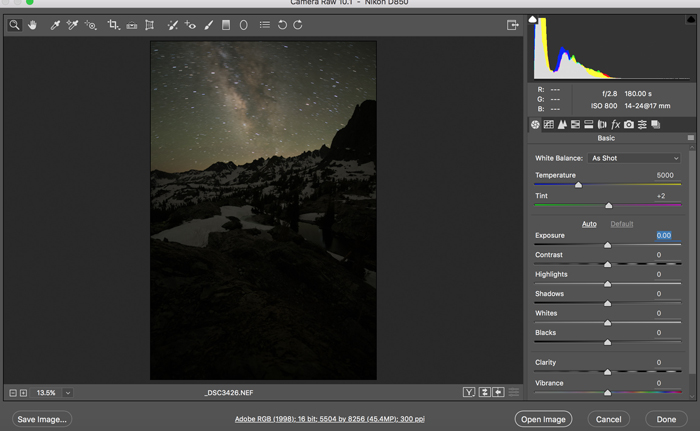 Raw file: _DSC3426.NEF.
The following two screenshots show the 100% fragments of foreground and background from the above raw file _DSC3426.NEF, using hyperfocal distance focusing with aperture f/2.8 and focal length 17mm on Nikon D850.
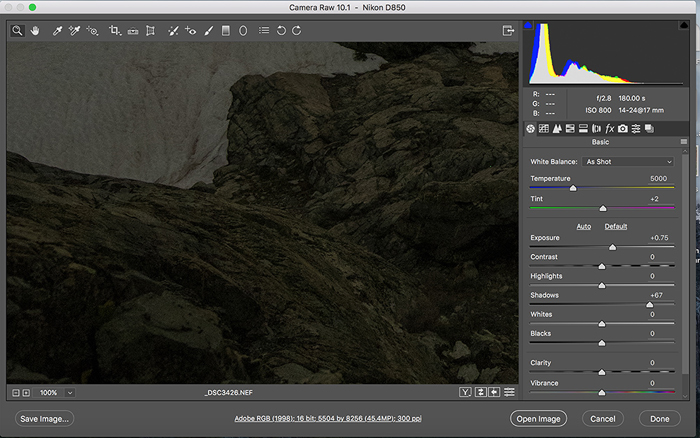 A 100% fragment of raw file _DSC3426.NEF shows the sharpness of the foreground.
 A 100% fragment of the same raw file _DSC3426.NEF shows the sharpness of the background mountain.
Tip 3: When we calculate the hyperfocal point and do test shootings in daytime, we should set our camera aperture to f/2.8 because that aperture will be used in our night photography, and define a different hyperfocal distance from the aperture that we usually use in daytime such as f/8 or f/11.
Tip 4: Using a proper focal length for taking panorama shots is important. In general, I take multiple individual shots in portrait format with a focal length between16mm – 20mm, which is a good balance between the wideness and lens distortion when we stitch the pictures together in Photoshop. Try to avoid using an extreme wide focal length, such as 14mm or less, as the merged image produced from Photoshop would likely have a large horizon distortion.
Mastering the exposure
Once we decide the correct aperture and focal point, the final task is to take actual shots when night falls.
My goal for photographing Minaret Lake and Upper Yosemite Falls was to not only capture the amazing night sky with the Milky Way appearance, but also have interesting foreground details with appealing visual perspectives.
To achieve this goal, for each of these two photography actions, I took two series of shots, which formed two panorama images after stitching together – one focused on the foreground and one focused on the sky, with the same focal points but different exposure times.
In Minaret Lake location, I started to photograph the foreground of the scene at 12:40am on 8 June 2018, in portrait format of Nikon D850 with lens 14-24mm f/2.8 at 17mm focal length.
I shot 9 frames from right to left, covered about 150 degrees of view. I made sure that the each shot covered sufficient lower part of the foreground, as well as had about 40% overlap with the previous shot. This process took one hour to complete – each shot took 3 minutes exposure plus 3 minutes noise reduction, altogether 6 X 9 = 54 minutes.
After completing the foreground shooting, I waited a while until the Milky Way moved closer to Minaret peaks. The second series of 9 shots mainly covered the sky, for that I titled my camera up 30 degrees so that more sky was captured, while the focal point remained unchanged.
Shooting information for Minaret Lake
The first series of 9 foreground shots
ISO: 800
Aperture: f/2.8
Focal length: 17mm
Shutter speed: 180seconds
Camera noise reduction: On
The second series of 9 sky shots
ISO: 6400
Aperture: f/2.8
Focal length: 17mm
Shutter speed: 20seconds
Camera noise reduction: Off
Photographing Upper Yosemite Falls was done using a similar approach. But there were two key differences: (1) I took a series of 8 sky shots first, and a series of 8 foreground shots next, because the Milky Way appeared on the preferred position right after the dark night started; and (2) I set ISO 3200 for the foreground long exposure shooting, because the mountain surroundings were extremely dark in Upper Yosemite Falls.
Similarly to the case of Minaret Lake photography, when I took photos of the foreground, I titled my camera down a bit in order to cover a larger part of the lower foreground.
Shooting information for the Upper Yosemite Falls
The first series of 8 foreground shots
ISO: 6400
Aperture: f/2.8
Focal length: 18mm
Shutter speed: 20seconds
Camera noise reduction: Off
The second series of 8 foreground shots
ISO: 3200
Aperture: f/2.8
Focal length: 18mm
Shutter speed: 180seconds
Camera noise reduction: On
Using a long exposure time to photograph the foreground was critical in this mountain night sky photography practice.
 (a) Long exposure for Minaret Lake: 180 seconds with camera long exposure noise reduction on.
 (b) Long exposure for Upper Yosemite Falls: 180 seconds with camera long exposure noise reduction on.
As we can see from (a) and (b) above, through a long exposure, the camera was able to capture subtle details of the foreground, without introducing much noise, as illustrated in the red circles in (a) and (b), respectively.
Tip 5: Even if under an extremely low light condition in a mountainous environment, taking a long exposure shot may capture some interesting low light reflection on the foreground surface, which would provide a useful starting point in post processing to reveal the foreground details and produce a moody and surreal dark image as a final result.
Post processing
Having successfully completed the field shooting, it came to the last yet the most personal phase – post processing. My approach of processing these images was based on two general ideas for night sky photography: (1) the final image should be consistent with the colour and tone of the scene illustrated in the original raw files; and (2) the final image should reveal an overall moody and surreal atmosphere of the scene.
Step 1: Photo merging.
Taking Minaret Lake as an example, by using “Photomerge” function in Photoshop CC 2018, I did two photo merges, one for the series of 9 foreground photos, and the other 9 photos for the sky. The results are shown below:
 Image 1: Initial result after photo merging from 9 foreground raw file images (horizon distortion occurs).
 Image 2: Initial result after photo merging from 9 sky raw file images.
We can see that Image 1 displays more horizon distortion than Image 2. The reason for this difference is that when I took foreground photos (the first series of 9 shots), the camera was more towards the lower part of the foreground, and as such, a larger distance difference between the foreground and middle ground eventually caused a bigger horizon distortion in the merged image.
By applying a sequence of “Warp” transform operations on Image 1 in Photoshop, I could correct such distortion, and finally transformed Image 1 to Image 3 as follows.
 Image 3: Result after adjusting Image 1 by correcting the horizon distortion.
The last operation in this photo merging was to blend the sky part from Image 2 and the mountain and foreground part from Image 3 together, which finally generated Image 4. Image 4 also formed the starting basis for the following processing steps.
 Image 4: Blended from Image 2 (sky) and Image 3 (foreground and mountains).
In a similar way, I got an initial merged panorama image for Upper Yosemite Falls, as showed below.
 Image 5: Merged initial Upper Yosemite Falls panorama image.
Step 2: Controlling the color and tone.
After photo merging, the colour and tone were the first thing I paid an attention in the next processing. Generally I preferred to retain the consistent colour and tone from the original raw files, where Auto White Balance in the camera setting was used.
By observing Image 5, for instance, I noted that the overall colour and tone presented in the picture was pretty warm, from the village light to the giant mountain walls, all displayed a warm yellow tone. So I decided to go with such colour and tone with a proper enhancement.
I used two simple tools for doing this. Firstly in Photoshop CC 2018, by going to “Filter => Camera Raw Filter…”, I brought the image back to Camera Raw, where I slightly increased Temperature. Then back to Photoshop, by going to “Filter => Nik Collection => Color Efex Pro 4”, I started the plug-in Color Efex Pro 4, in which I used Skylight filter with strength 10%. Image 6 below shows the result after these adjustments.
 Image 6: The result after the color and tone being adjusted.
Step 3: Enhancing the visual perspective in low light atmosphere.
Thanks for the long exposure through that the details around the foreground and mountains have been recovered in Image 6. But as we can see that the overall image is still a bit flat. The aim of this step, therefore, is to establish some visual perspective, and to enhance the overall mood and atmosphere of the scene.
 mage 7: Result after enhancing the foreground perspective and overall atmosphere.
Image 7 above is the result after this step processing. Basically, I did two major adjustments to achieve this effect: one was to increase the foreground contrast in order to restore a visual perspective from near to far. To achieve this, in Photoshop, I added a “Soft Light Layer” with the box of “Fill with Soft-Light-neutral color (50% grey)” ticked, and then through a sequence of dodge and burn operations, I made the near foreground darker, and the far end foreground brighter. In this way, a 3D-like perspective from near to far became quite clear. Then I applied the Contrast Color Range filter from Color Efex Pro 4 of Nik Collection to further refine the foreground contrast.
The other critical adjustment was to selectively increase the brightness and contrast of the mountain walls and the Milky Way centre, using a similar way described above, such that more subtle details of these parts were naturally highlighted.
A similar approach was used for processing the Minaret Lake image. The final result is shown as follows.

The final panorama image of Minaret Lake.
Step 4: Preparing the final output.
The final step in post processing was to store the final Photoshop file and produce a jpeg image for web display. Before doing this, I would first check the image to see whether it fitted in a standard panorama image format, which usually requires the ratio between the long and short sides be 2:1 or bigger.
I realised that the Upper Yosemite Falls image, Image 7, was of the dimension of 13992 pixels X 7060 pixels, not exactly of 2:1 ratio. So I reduced the width of image down to 6500 pixels, and made the image become a typical panorama form, as shown below.
Final adjustment: Making the ratio of long and short sides to 2:1 or bigger would make the final image be a typical panorama look.
For the Minaret Lake final image, i.e., Image 8, it was of the dimension 11375 pixels X 5500 pixels, which is already about 2:1 ratio between the long and short sides. I did not further reduce the width of this image, because that would make the Milky Way on the left side of the peaks look shorter.
Having done such ratio checking and adjustment, I saved both final images in psb format (Large Document Format) of Photoshop. Then I also wanted to produce a small size image for displaying on social media such as Facebook and Instagram.
For this purpose, in Photoshop CC 2018, I first resized the image down to 4000 pixels X 1858 pixels. Then I duplicated the background layer, selected the mode to be “Luminosity”, as shown in the following screenshot. This would prevent any colour shifting during sharpening.
In the following, I started to sharpen the image by going “Filter =>Sharpen => Smart Sharpen…”. In Smart Sharpen dialog window, I set Amount 100%, Radius 0.3% and Reduce Noise 3%. After this sharpening, I did one more time Smart Sharpen, but this time reduced the amount to 50% and other parameters remained unchanged.
Finally, I merged two layers, and reduced the file size to 2000 pixels X 886 pixels, i.e., half of the size of the image that I just sharpened, which was also the final size of the output image. I saved the image by going to “File => Export => Save for Web (Legacy)…”, by clicking OK, Photoshop then output a jpeg file that was suitable for web display.
 Sharpening for web display.
Tip 6: Colour of night sky is not always blue. In fact, a blue night sky usually only occurs soon after sunset, before sunrise, or after moonurise. In a moonless night, the sky colour can be quite different and constantly change. In post processing, keeping the consistent colour and tone of the sky captured in the original raw images may help to recover and enhance the mood of the scene in the dark night.
Acknowledgement
I am grateful for my California fellow photographers Willa Wei and Yu Shi. Without their companion and support, I would not have possibly undertaken this trip, and obviously, would not have made these two unique photographs after all. For this trip, Willa and Yu provided most critical and detailed information, such as the photography plans, national park information, GPS and topographic maps of the locations.
. '

