How to Change White Balance in Photos With Adobe Camera Raw (Post-Process Basics)
Adobe Camera RAW is a powerful program for processing your pictures. White balance changes colour of the white tones in your photograph so that they appear...
 Best photography related news, reviews and tips in one handy spot. Easy access to the best photography sites. For you to enjoy!

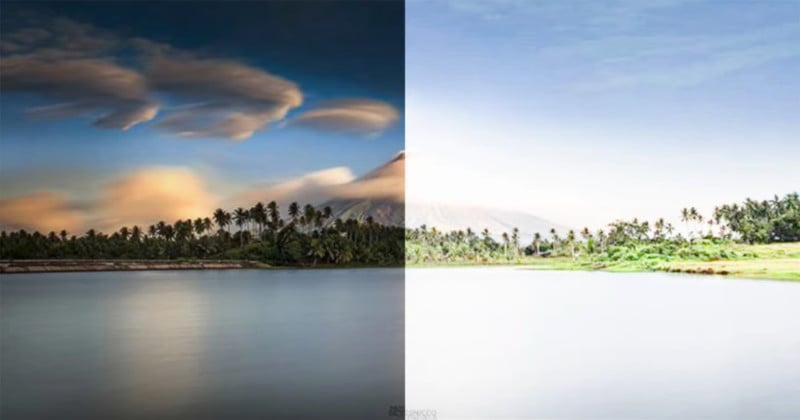
Look-Up Tables, or "LUTs," are a handy way to make changes to the look of an image or video, letting you instantly alter colour and tones.
The great
thing about LUTs is that even though they’re usually associated with film—as
opposed to actions or presets which are usually linked to stills—you can actually use LUTs across any software
that supports them, which includes Adobe software for photographers like
Lightroom and Adobe Camera Raw. Unlike actions or presets, they work with
colours in your original file, so they look up that value in a table and come
back with a new colour value.
Because it isn’t
touching your basic editing sliders, you can use a LUT at pretty much any stage of your editing
process and still have the flexibility to make changes.
LUT work on the most basic part of the image: the colour profile. By contrast, when you use an action or preset they work off the image you’re running the action on – whether that’s unprocessed or processed – and make changes via the various image adjustment tools in the software. This means LUTs give you more creative control, as all of your adjustment values remain at 0 once the profile has been applied.
LUTs are a quick way to get a particular effect or look. Flipping through LUTs to see their effect on a photo can be good inspiration, you might want to use that as a starting point for your editing. Or you might want to process a number of photographs so that they have a similar style – LUTs are great for that too, as long as your RAW images are similarly shot (roughly the same colours and tonal ranges) then the effect you get will be the same (or close enough) on each which is useful for people like Instagrammers who want to keep their profile looking neat and purposeful.
LUTs for ACR can come in two file formats: .xmp and .cube, though presets can also be .xmp as it’s just a standard for metadata across Adobe platforms (and beyond). If you search for LUTs you should get either just .cube files, or the same package in a few different file formats so that it works across multiple programmes. What you’re looking for is something that creates a colour profile, rather than a preset, and you’ll know the difference because a preset/action will adjust your ‘basic edit’ sliders.
If you’re a member of Envato Elements, there are lots of LUTs to choose from and they’re all part of your monthly subscription. Let’s take an example set of LUTs from Envato Elements to demonstrate with:

To install .cube LUTs in ACR you may need to create a custom profile. Most likely, you’ll be installing .xmp files.
Next to Profile click the magnifying glass on squares icon, Browse Profiles.

A list of your colour profile options will appear. Right-click anywhere on the list and click Import Profiles & Presets.

You’ll then be able to select your zipped profile(s) from the relevant folder.
There are two issues with this, the first is that you’re taking the profile from a random folder on your computer rather than keeping everything within Adobe folders, which is fine but if you’re a neat-freak like us then you might like everything to be in one place. The second problem is that adding profiles this way has been known to be buggy and not work. Which brings us to the second method.
At this point you’ll need to access a folder that’s usually hidden, so click View on your menu at the top and check the box marked Hidden Items.

You’ll now be able to see App Data. Open it and then navigate through the following folders:
This is the folder where you can drop your LUTs. If you’re dragging them to the folder be aware that it’ll move them, so you may want to copy and paste them into the folder instead.
Once you’ve done this, restart ACR and your profiles should be visible under Browse Profiles.
Using LUTs is incredibly easy once you’ve got them installed and ready to go. Back to our example set – if you navigate to your profiles and drop the Dramatic Landscape list down, you’ll see thumbnail previews of each effect on whatever photo you have open in ACR.

If you hover over each thumbnail you’ll see a preview on your main image. Select one – we’ll choose Donnelly 02 S as an example and head back to your main Basic Adjustments menu.

You’ll now see in Profile it says Donnelly 02 S, with a slider underneath set to 100. You can use the slider to adjust the strength of the profile to either increase or decrease the effect.
You’ll also notice that all your other sliders are still at 0. If you’d made adjustments prior to applying your LUT, they’d still be in the same position, which is the main benefit of a LUT, no changes to your sliders.
You can now make your other edits based on your chosen colour profile, including further changes to the colours in the Colour Mixer. You might end up with something that looks completely different from the profile you applied, but it’s created a good base. Or, you might decide that just the LUT applied along with a few quick adjustments is all you need.

Export your photo to your linked Adobe suite and save to an appropriate format. If you decide that the profile you applied just doesn’t work, you can open the image and and start again, as your photo can easily be reverted to the original, or you can keep your basic adjustments as they are and just flip to another colour profile – that’s the joy of LUTs!