Tips & Tricks

How to Use Use Auto-Reframe to Crop Your Video in Premiere Pro
Tuts+PhotographyIn this lesson from David Bode's FREE Ultimate Premiere FAQ course, you're going to learn how to use Auto-Reframe to reframe your videos for different aspect ratio outputs.
Varying Video Formats
1920 by 1080 is a pretty standard size for videos, but with the popularity of social media, both vertical and square videos have become extremely popular. Luckily, Premiere has a really nice feature that can help you reframe your videos with little effort.
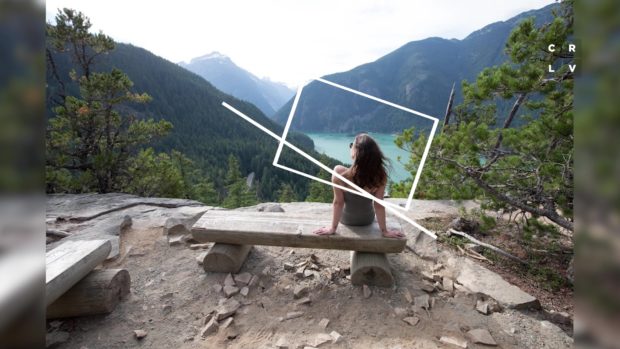
Auto-Reframe 9:16
Right-click on your sequence in your Project panel and choose Auto-Reframe Sequence. You'll get a dialog box with a few different presets. Select 9:16.
You also have a motion tracking dropdown where you can pick a few different options depending on the type of motion in your video. If there's a lot of fast-moving action, and you want it to move between the subjects or the things that are in focus or being featured, you want to choose the fast motion option, but for the average video, Default is a good place to start. Select Create.
Auto-Reframe does a great job of analysing the clips in your footage and figuring out what it needs to be focusing on. Sometimes, though, it will have a problem with tracking fast movement or deciding which elements it should choose to highlight in a frame. In those cases, you need to go in manually and make specific corrections.


In the example shown, there is a bit of weirdness in the shot related to the moving horses and the panning action employed, so in a case like this, you can change the preset from motion tracking to fast motion and re-assess the clip. If that doesn't work, try slower motion. In this example, it worked brilliantly.
In some cases, as in the second example, where there are two people in the frame and the presets for motion tracking from one to the other did not work, you will need to go in and edit keyframes yourself.
To do so, delete all the keyframes except the first. Then, slowly move from the first subject to the second subject and set a second keyframe. Adjust the temporal interpolation by adding an Ease Out and then Ease In. This kind of manual work should work better than the presets, but most of the time the presets work just fine.


If you look in the Project panel, you will see a new folder titled Auto-Reframe Sequences where all your new sequences will be contained.
Auto-Reframe 1:1
Creating a square clip is often easier than a vertical clip just because there's more room for the video's content. To do so, just repeat the same steps you did with the vertical format: right-click on the sequence in your Project panel and choose Auto-Reframe Sequence.


Select Square 1:1 and let Auto-Reframe work its magic. As is the case with the vertical frame, most of the time it will get it right, and for the odd times that it does not, you may need to find a palatable compromise solution.
More Premiere Pro Resources
Here are more top Premiere Pro tutorials and resources to try from Envato Tuts+:

 10 Top Colour Effects Preset Packs for Premiere Pro
 Marie Gardiner04 Mar 2022
 10 Top Wedding Invitation Video Templates for Premiere Pro
 Nona Blackman17 Feb 2022
 How to Find Your Way Around in Premiere Pro, a Tour for Beginners
Nona Blackman03 Feb 2022
How to Find Your Way Around in Premiere Pro, a Tour for Beginners
Nona Blackman03 Feb 2022
 10 Top Logo Sting Animation Templates for Premiere Pro
 Andrew Childress04 Mar 2022