Tips & Tricks

Skin vs. latex, or the forgotten concept of 5 lighting zones
Smoking Strobes-Glamour Photo Tips 


I feel like people who have a fetish should celebrate that and enjoy it and yes, my heart is wide open for all forms of playfulness [dramatic pause]... But when those rubber fetish guys told me that latex is like a 2nd skin, I thought, boy, they obviously have no clue what they are talking about. I mean looking at it from a photographic point of view, they compare a pretty matte, dim and complex textured thing like “skin”, with a really shiny and completely untextured surface like “latex”.
Photographically, if I am shooting light at them, those two have pretty much nothing in common!
Maybe I missed the point of their comparison. But for my fellow photographers I want to make clear, that those two surfaces react completely different to light. Once you know the differences and once you can control your light source so that you can amplify or remove the differences, you enter a whole new ballgame of lighting. You are really mastering light. For instance: You can now use your knowledge to make rubber looking even more like rubber than it does in reality. Just care that the specular highlights are bright and have sharp edges - for instance.
Does not make sense to you? Then watch the video:
Some photos from this photo shoot
Model: Notorious Estrella
Styling: Emily
I wish you good light!
-- Michael
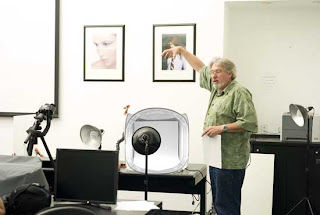
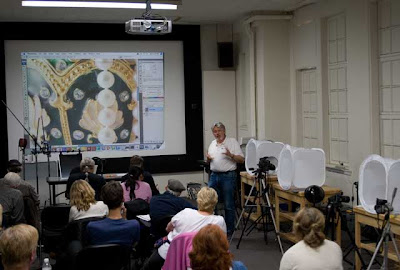
Hey fellow photographer, how is it going, this is glamour photography tips and I am Michael Zelbel and here is what I have got for you today. Today it is all about how to really master a lighting, if you really master it, then you can bring across the free dimensionality of the object that you are shooting and you also bring across the surface texture so that the viewer can imagine how the depicted item is feeling when he is looking at your photograph, that is one of the stuff that good old Dean Collins was teaching very well and I am using it today. Al right today I am shooting Cousin Notorious Strella in her latex outfit and I found that is the perfect opportunity to tell you something about you know how to light this latex outfit so that the viewer of your photo can imagine how the latex, how the rubber is feeling when he would be reach into the photograph. I bet that is interesting, however the theory behind that lighting it’s pretty complex and it is something new, you probably do not want to hear but I am going to tell it to you anyway, so keep on watching, don’t switch away. The thing is in order to really really master lighting, you have to accept at least one inconvenient truth and that is while most books might have told you that you have to care about the highlights and the shadows in your photo, this is cool but this instruction is just half of the truth, actually it is even less, it is just 2/5 of the truth to be exact because they are not just 2 important areas that each light source projects onto your subject, they are actually 5 important areas. Here is the case what I mean: I asked Notorious Strella to stand right next to one of the umbrellas that we used in the shoot and now let us have a look at what this umbrella does to her latex dress. It is mirrored nicely over here in her chest area, so let’s zoom in a bit to her chest and what do we see over here? Well the first thing is this reflects the mirror and that is the specula highlights, how we call it, that is really where the light source is sending direct beams to the subject and they are directly reflected back to the lens, that is where we can see the light source and then across there is a shadow area where no light is hitting in the subject any more or very very little light so the black dress over there is really really black and that is the shadows. But now the next thing comes, is the defused area, this is something in the middle where the black is sort of grayish and the red tones are still pretty light. This is where some light is hitting her dress and the light is not directly from the light source, it is bouncing off somewhere but there is still light, it is not really shade and then we can have a look at how all these three areas meet, I mean there is pretty clear separation between the areas but it is not exactly sharp yet, it is not the light source is really really sharp depicted over here, there is an area which is a little bit diffused and that is called the specula edge transfer. It is just showing that the light source is not really in focus or that the material is not a perfect mirror, that is a little bit of unsharpness and the same with the shadows, there is a shadow edge transfere where the shadow is blending into the diffused area. That is not all of a sudden a jumping tones, it is a blend. And this is example on the latex but exactly the same areas, are there if we have a look at the much surface, like for instance a skin over here. Now you have got specula highlights and there they are this is where the light goes directly hits the subject and it is reflected back, you just don’t see a clearer picture of the light source because the surface is matt and there is also the diffused area with mid tones over there and there is also the shadow area over here but the transfer areas they are much wider as a specula highlights reach far into the mid tones and the shadows reach to the mid tones and it is one soft sweep so to speak, so this large specula edge transfer, shadowedge transfer areas they tell the viewers of this photo that this surface is actually matt and it is not shining over there. So this is what this fire flash lighting area, they tell you about surface texture, also free dimensionality and it is all of in your control, it is up to you what you project onto there and if you want to bring across let say shiny latex or if you wan to carry it by making the light really soft over there so that you can’t see the light source, it is apart that people are that you know what is going on in these areas, that if possible use it to your advantage. Okay, okay I think that is enough really complicated stuff for today so let wrap this quickly with something really simple and I mean the actually lighting set up for the shoot. As you have already seen, we have got 2 umbrellas over there, one is left to the model one is right to the model, the umbrellas are hidden behind a large reflectors of mine and I covered some reflectors with some black curtain just in order to introduce a little mystery to the scene so that the viewer of the photograph, he doesn’t really 100% know what is going on there and the model is placed somewhere, probably in a clap or anything you don’t know. I have got the 2 speedlights behind the umbrellas and in order to set up the speedlights for the adjustments, I did nothing, absolutely nothing! And they are both running on TTL without any adjustments and which is fine. I did set up the camera, I did set it up to f/11 and I crank up their ISO400 in order to here how the flesh is not working too hard. I hope I didn’t fry your brain too much with too much complicated stuff, just try it out, use it in your photo shoots, see what you can do with the fire lighting areas and when you change the lighting a little bit, just try it out, do something with it and let me know what you think about it, please comment below the video, tell me whether that was useful for you or not, in any case I hope I didn’t scare you away and I really hope you comeback next Thursday for the next video and until then, I wish you a whole lot of fun with your photo shoots and like always I wish you good light.