Tips & Tricks

How to Animate in After Effects
Tuts+PhotographyIn this hands-on course, you'll learn how to animate in After Effects by completing three practical animation projects, with full step-by-step instructions.
Jump straight to the project that interests you the most:

What You'll Learn
- The basics of keyframe animation in After Effects
- How to reveal text with masks and shape layers
- How to create a futuristic animated logo reveal
- How to create an animated sci-fi intro
- How to use the inertial bounce expression, the wiggle expression, and more
About Your Instructor
David Bode
I'm an expert on video and audio production in the upstate NY area. I've created content for VH1 and Discovery Networks, as well as inspirational videos that have been seen by millions. In early 2011, I started my own business (BODEMEDIA.TV) helping people create great-looking videos.


1. Introduction
1.1 Introduction
In this first video, I'll introduce you to the course and take you through everything you'll learn. You'll get a quick preview of the After Effects animation skills you'll master and the three practical projects we'll be completing together.
"These projects will use a combination of keyframe animation, text reveals, and After Effects expressions to create some complex and subtle movement."
After Effects for Beginners | FREE Mega Course
- Master the main After Effects tools, panels, and settings.
- Work with compositions, layers, and masks.
- Use motion tracking, mattes, effects, and more.
2. The Basics of After Effects Animation
In this chapter, we'll look at the basics of animation in After Effects. You'll learn about keyframe animation and then build a cool text box reveal.
2.1 Keyframe Basics
Watch video lesson (14 mins) ↗
The basic building block of animation in After Effects is the keyframe. Animating with keyframes is easy.


When you have your first keyframe created, you can then move the object and create another keyframe at a different position and time. Congratulations! You've just created your first animation in After Effects.
Of course, there's still a lot more to learn, so watch the video to see more examples. I'll also explain the difference between linear, eased, and custom interpolation between keyframes.
2.2 Reveal Text With Masks and Shape Layers
Watch video lesson (12 mins) ↗
Another important technique to master in After Effects animation is masking. So now let's look at how to reveal text with masks. You'll also learn how to use shape layers as track mattes.
To get started, just select your text and go to Layer > Mask > New Mask (Control-Shift-N). You'll see a mask created around your text.


With the layer selected, press M to bring up the Mask Path. Then you can create an animation simply by changing the position of the text at different points on the timeline. For example, you can drag the mask across to make the text invisible at the start and have it fully visible after 1 second. This will create a nice simple text reveal from left to right.
We'll go through some more complex effects in the video, so be sure to check it out. And if you're curious about the font and other resources I'm using, just click the links below.
Related Links
- Fonts on Envato Elements
- Devant Horgen Font on Envato Elements
- Creative Titles Package on Envato Elements
2.3 Basic Text Box Reveal
Now let's kick things up a notch. We're going to put our text in a box and create a more complicated animation, where the box expands from the middle, the text is revealed from left to right, and then the whole thing disappears again in a nice, smooth animation.


We'll be using the Creative Titles Package to help us create this animation, so check out the details to get a preview of what you'll be making.
Related Links
- Creative Titles Package on Envato Elements
- Fonts on Envato Elements
2.4 Bounding Box Reveal
Watch video lesson (12 mins) ↗
In this part of the course, we'll finish up the text box reveal by picking up where we left off in the last lesson and animating the bounding box. I'll take you through all the details of working with keyframes, masks, and more, showing you how to position everything on the timeline and choose all the right settings to get the result we want.


We'll also introduce some cool effects from the Effects & Presets panel in After Effects, such as adding a Camera Lens Blur to the final animation.
Completing an animation like this involves quite a bit of detailed work in the After Effects timeline, moving things around and experimenting until things look just right. It's worth it if you want to create a smooth, crisp animation, though, so follow along with me in the video and see how it's done.
2.5 Text Reveal Rectangles: Part 1
Watch video lesson (13 mins) ↗
In this lesson, you will learn how to create another text reveal using shape layers. You'll also learn how to set up the comp so that you can resize to fit changing text lengths.


Again, I'll take you through all the steps of animating this effect in the timeline. You'll get more practice using mattes, shape layers, guides, and more. Most importantly, you'll also learn how to set up the animation so that it's flexible and will still work if you need to change the text and shapes in future.
Related Links
- Text Reveal Video Templates on Envato Elements
2.6 Text Reveal Rectangles: Part 2
This is the second part of the text reveal described above. I'll continue showing you all the steps involved in making this animation, and I'll also introduce you to the very useful Motion Tool by Mt. Mograph. It's a third-party extension that will give you access to a whole new panel in After Effects:


With this panel, you can easily adjust your animation speed and other things just by dragging sliders and seeing a visual representation of the speed curve.


With the Motion Tool, it's much easier to make fine adjustments to the details of your animations.
3. Burger Logo Reveal
Here's a common scenario: you're given a logo or illustration by a designer and told to animate it. But you'll need to do some work to get the artwork ready for animation in After Effects. In this chapter, we'll go through the whole process of turning a static logo into a beautiful animation in After Effects.
3.1 How to Prepare the Artwork
Watch video lesson (12 mins) ↗
Our starting point is a flat illustration that's all on one layer and can't easily be animated:


To prepare it for animation, we'll need to take it into Adobe Illustrator and open the Layers panel. Click on the flyout button at the top of the panel and select Release to Layers (Sequence) from the dropdown menu.


Now, all the elements of the illustration are on individual layers, making it much easier to animate them separately when you import the file into After Effects.
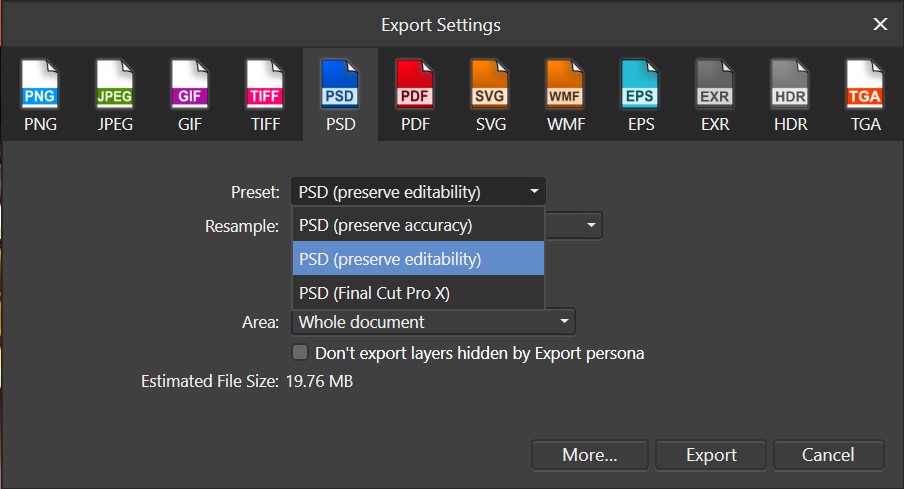
When you've got everything set up, then it's time to import the file into After Effects. Watch the video to see how to choose the right import settings and then get all the layers set up properly so that they're ready for animation. We'll also add some simple animation to the text.
Related Links
3.2 How to Animate the Layers
Watch video lesson (11 mins) ↗
Now it's time to animate the layers that we prepared in the last lesson. We'll start with the lines coming out from the burger. Right-click on the Lines layer and choose Create > Create Shapes from Vector Layer.


We've now converted all the lines to individual paths that we can animate easily. I'm going to add a wiggle effect by going to Contents > Add > Wiggle Paths.
Next, we'll animate the burger bun, so that the two halves of the bun move apart to reveal the text in the middle.


Here's what we have so far:


3.3 Add the Final Touches
Watch video lesson (11 mins) ↗
In this lesson, you will learn how to put some final touches on this logo animation, including using an inertial bounce expression.


Add the Finishing Touches
Add Inertial Bounce
Copy and paste code from Gray Machine to add an inertial bounce expression to the animation.
Modify the Expression
I'll show you how to modify the details of this third-party expression to get just the effect you're looking for.
Make the Burger Bun Solid
Because our original illustration was made up of outlines, it didn't look quite right when the shapes overlapped. I'll show you a couple of neat tricks in Illustrator and After Effects to give our burger bun a solid background.
Related Links
4. Outer Space Intro
For our next practical After Effects project, we'll create a sci-fi-themed outer space intro. You'll learn how to add lens flares, glow effects, work with 2.5D in After Effects, and much more!
4.1 How to Animate With CC Lens
Watch video lesson (10 mins) ↗
Again, we're starting with a flat image, and we'll need to do some work to animate it and make it look interesting.


We'll use 2.5D, which is the After Effects version of 3D.
"After Effects can do 3D rendering, but when we're dealing with flat planes that have no real depth to them, we can use a 2.5D effect."
We can start by toggling on the 3D layer switch.


Then right-click on the layer and choose New > Camera. And now, when you press C on the keyboard, it will bring up the Camera tool, which will let you move each layer around to create 3D effects, so that the title looks as if it's in front of the background in 3D space.
To make it look even more three-dimensional, we'll also use a CC Lens effect from the Effects & Presets panel. This will create a distortion in the background, helping to create the 3D parallax effect we're going for.


Related Links
-
Gempire Font (
#63d8e5) - Futuristic Background
4.2 How to Animate Strokes & Glow Effects
Watch video lesson (14 mins) ↗
In this lesson, you'll learn how to punch up the text by animating strokes and working with glow effects to give this a fantastic look.
Start by right-clicking on your text layer and choosing Replace with Precomp from the dropdown menu. Then right-click on your newly created precomp and choose Create > Create Shapes from Text.
I'll also show you how to add glow effects to text in After Effects, so we can get a real sci-fi theme going here. And I'll introduce you to a very useful third-party plugin called FX Console.


4.3 How to Add Lens Flares
Now let's see how to add some lens flares using Video Copilot’s Optical Flares preset. This is another third-party preset that you can install and then access from the Effects & Presets panel in After Effects. It gives you a range of pre-built lens flares to choose from:


And you can then fine-tune the settings to create the exact look you're after.


Our end result will be a cool-looking lens flare that flashes on screen briefly to add some drama to our animation.


4.4 How to Add Noise & Grain
Watch video lesson (12 mins) ↗
Now I'm going to let you in on a little secret. When you use lens flares and gradients, you'll often see some banding in your final renders. The secret to removing this banding is to add some noise and grain, also known as dithering.
Here's what the banding looks like:


It's quite subtle, so you only see it when you zoom right in, but we don't want anything that could make our work look less professional, so I'll show you how to use noise and grain to cover it up.
"First of all, noise looks cool. It adds a nice grit to your effect. Secondly, when your video gets compressed, a lot of the more obvious noise will get compressed out, so the result will be much smoother, with some very subtle noise and no banding."
5. Boutique Text Effect
Now it's time for our final project. You'll learn to animate handwritten text, make leaves look as if they're blowing in the wind, and more!
5.1 How to Prepare the Artwork
As before, we'll start with some vector artwork that's all on a single layer:


We'll use the same techniques as before to break it onto separate layers in Adobe Illustrator for easier animation, and we'll name the layers and organize everything properly so that it'll all make sense when we import it into After Effects.


I'll even show you how to go further and isolate each individual leaf element in Photoshop so that we can apply some animations to each one later on in After Effects.


Related Links
5.2 How to Create the Layout
In this lesson, you will learn how to import and lay out all the assets in After Effects to match the original art. Because we set up everything properly in Adobe Illustrator, things will look pretty good when we import the file to After Effects.
However, we will have to import those leaf elements individually and then position them correctly. Then we need to name our layers appropriately, stack them, and color-code them for easy reference.


5.3 Add an Inertial Bounce Expression
Watch video lesson (11 mins) ↗
Remember how we added an inertial bounce expression to our burger logo earlier? Now we're going to add the same expression to the leaves in this animation, so that they appear to grow out from the sides of the page and then bounce back slightly. It'll give us a great "spring-to-life" effect.
I'll also show you how to control the details of the inertial bounce effect, and you'll see what's going on both in the code and in the visual representations:


Related Links
5.4 Add a Wiggle Expression
Now it's time to add a wiggle expression to give the leaves a gentle motion that makes it look as if they're blowing in the wind.
We're going to write our own expression for this. Don't worry—it's simpler than it sounds! Just Alt-click on the rotation stopwatch for one of your leaf layers and type "wiggle" in the box. After Effects will prompt you with the wiggle() expression, and then you just type in your parameters.
So we can type, for example, wiggle(10,30). This will give us a wiggle with a frequency of 10 times per second and an amplitude of 30.
Of course, writing individual expressions for each individual leaf will be tedious, so I'll show you a way to link them all together and make it easy to change the values for all the leaves at once using a simple slider.
5.5 Add Layer Control
Now, we need to do a little housekeeping. We added a controller in the last lesson to help us control the animation of the leaves, so now we need to duplicate our